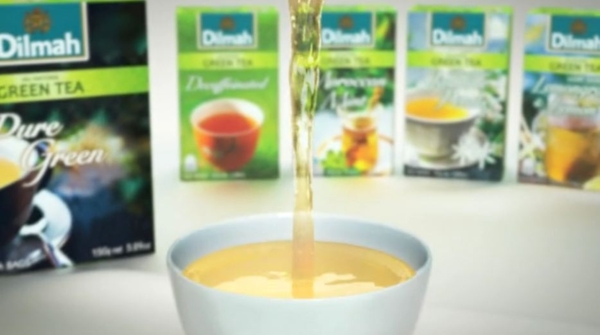
This is the first project I ever done for my current company (as a freelancer). My contribution, simply, was the RF fluid sim at the end. Dominic wanted to simulate the twisting shape that forms usually at the nozzle of a spout or tap, so he twisted his golden ribbon. I couldn’t get RF to sim in that way, so I let RF run normally and used Maya’s wrap deformer on top of the RF bins. Quite a simple solution, which I liked.
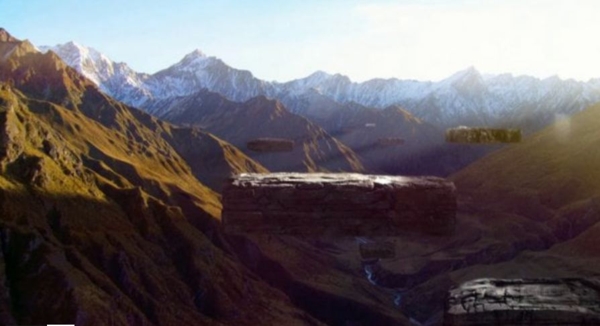
The original project had already been completed by the time I got called in; it was for a ‘redux’ version of the ad. In this version, I simmed rocks rolling along the surface of the monoliths (in LW), and helped fix and set up the Maya scenes for render.
I worked on this with Dominic Taylor who had set up the comps, cameras, and worked with the clients on the direction. I mainly did the flipboard effect.
This was quite a challenging and difficult effect to do in Maya. The main driver of the rotations was expressions; the expression were taking their values from samples from textures, which were generated from AE. The main difficulty lay in the fact that it was slow, and it needed to be baked out before it could be sent to the farm because setAttr was the mandatory method of applying the motions.
The flipboard effect was not only flipping from image A to image B; in fact, it goes through a series of photographs before it resolves into the final, and designing the mechanics of the scene took some tries before getting right.
In retrospect, LW’s nodal displacement in conjunction with Denis Pontonnier’s Part Move nodes is a superior method. Where it took me about week to get all the shots set up in Maya, I think I would have done the same in LW for less than half the time.
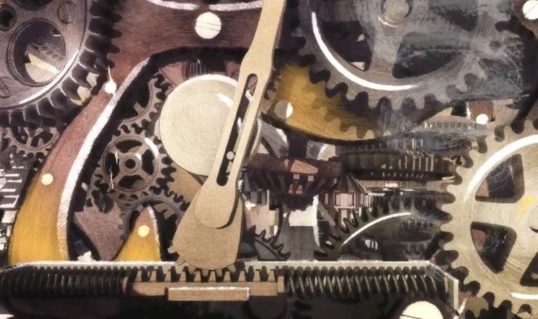
This was done a relative quick job for the New South Wales government. They had, in fact, recently come back to us for a ‘phase 2’ ad along the same lines, only the deadline was a bit shorter.
The ad was in two parts: the cogs and the town hall scene. I’ll just talk about the cogs scene because that was the only part I was involved in.
I was asked to create the cogs that formed the NSW state lines. We bought a few gears off Turbosquid to get started, but other bits and pieces had to be modelled along the way. I had first set up the layout of the gears, and rigged sections of them to follow different controllers. Then individual gear component combinations were rigged, and then placed into the main scene.
The rendering was also done in LightWave, but the final look was supposed to be hand-drawn. This process was in 3 parts.
The base render was from LW, which was a clean, multi-toned render. LW enables me to colour individual gears/items based on the fact that they are instanced or separated, and I used this to quickly shade variations of the colour theme. I like the fact that I can get lots of shading control across whatever shader channel (eg diffuse, specularity) that I’m using.
After the base render, Richard post-processed that in AE using his own concoction of adjustment layers and textures.
Like the name, this commercial is a near-perfect example of this work thread: minor work that tempts itself to be cast aside for being inconsequential. And yet, added together, everything is given its proper recognition.
I contributed to the library scene in this commercial. The car driving through the library is obviously real (is it? :) ), but the greenscreened car would not have appropriate reflections of the environment. So, I went to the shoot to take HDR spherical panos of the library, where the car was supposed to drive through.
Back in the studio, we were given the car’s (dodgy) CAD data, which I repaired extensively. Using other reference photos of the library, including the footage, I recreated the library to cast proper reflections on the cg car. I matchmoved the footage, and further hand-tracked it for pixel-accuracy, rendered the reflection pass. Leoni comped the final shot.
This was a crazy one, though a bit hard to explain how. If you find that above commercial is somewhat stylistically schizophrenic, then that goes some way in not having to explain a whole lot more. Like many of the works I do, it’s hard to claim substantial ownership, hence the sometimes-lengthy commentary.
I contributed a few sequences to this ad: the hacker-chess-armour-snow globe sequence that starts with Julian Stokoe‘s illustration of the hacker with a computer I put in there. I also did the pinball animation sequence before that.
Another good reason to break down some of my works is that I, myself, take my own work for granted. Before I reviewed the clip, I recalled that the pinball animation was my only contribution. Sure, this reflects the hectic day-to-day work, and my pathetic memory, but it underlines the need to give credit where it is due; less about outward or social recognition, but a true appreciation of what tends to be forgotten or ignored, even by me.
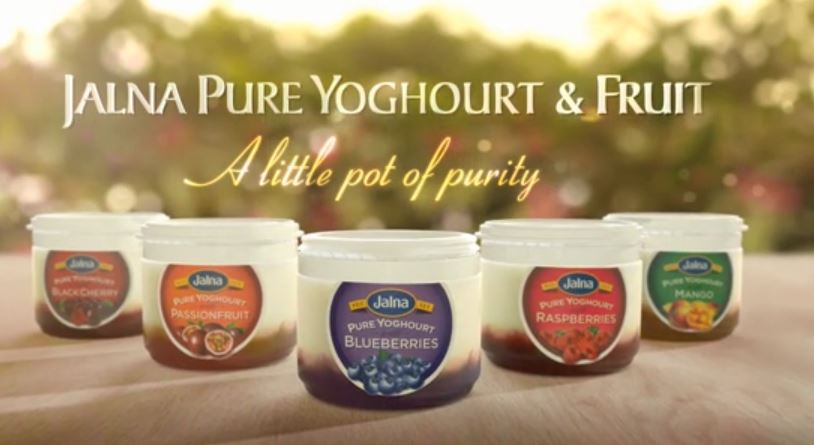
The cg aspect to this — falling blueberries on yoghurt in a pot — was another solo job for me. The final comp was a Flame job, though I always try to get 3d renders as close to the actual colours as possible.
There was no pre-production for me as this was just given to me all of a sudden; I would have liked to have gotten lighting information in the set and reference plates. Basically, what we had — not a whole lot — was all that I could work on. Thankfully, there was a close-up shot of the pot as part of the edit, which I used as projected texture back to my cg pot model. This allowed me to get graded colours directly onto the 3d render.
The viscous yoghurt fluid sim was done in Realflow, and rendered in V-Ray because the sub-surface shading there was very easy to get. But the rest of the elements were rendered in LightWave where I could get the most control over how colours were being rendered. This was important because I had also taken a piece of reference footage which showed how the pot looked like under a lighting condition similar to that of the cut. LightWave’s nodal shading system made it easier for me to control the shading of local areas.
Only one episode of this aborted series seems to be out on the Internet, which is the video you see above. In fact, three episodes were commissioned and finished; the two other episodes are lurking in someone’s hard drive, and although I could get a copy of it, I don’t think I’m legally authorised to upload it, regretfully.
All of the character animation in those three episodes were done by Brett Tunnicliff, save the titles, which I had done. Terry and I had been responsible for modelling and texturing the characters. I rigged, rendered, composited, and cut the the episodes myself. The direction of the first 2 episodes was headed by the boss. But by the third, its future prospects for its continuation waned — as did interest in it — and I was given the honour of finishing off the series oddment as a quasi-director.
Predicatably, the third was my favourite as I felt a bit freer to experiment; no one really cared enough to put their 2 cents into it by this time. So I tightened the storyboard to make the cuts fit in better, and began with a beauty pass timing animatic that I would get sign-off from the boss, and things proceeded smoothly from there. Brett commented that he particularly enjoyed the flow of the third episode, which is a nice thing to hear, as I enjoyed running my own small project.
No one would probably see that work, unfortunately. And sure, the end result might look dodgy to some, but to remember one of the reasons why I post these things: many jobs come with disadvantageous circumstances that affect the outcome, but if people knew just how much work was put in, they’d know it would have been a surprise anything came out of it at all. Most people appreciate only just the bells and whistles, or the polished gold trims, but I’m here saying that there is a hidden engine that powers all creative endeavours that should be recognised on equal footing.
Ah. Paper. Lots of paper. I helped contribute some scenes in this ad when I worked as a freelancer. This was a mixed bag, indeed. Rendered in Maxwell Render, some scenes were in LightWave, and some were in Maya. As a freelancer, I worked as a TD, too, and I helped troubleshoot Maya and LW scenes together. I ran cloth sims in LW, and helped render using Maxwell, though I hadn’t used it before.
I missed the days of working as a freelancer, when I knew that the lifespan of any trouble would only last for the duration of the job’s schedule.
This job was won from the strength of another win that was Toyotown: the director was rather pleased with our abilities, and wanted to work with us again. The Toyotown job had been given to me to lead; and I wanted to prove that a good workflow means all the difference to a good-looking product or a bad one. It gave the group an opportunity to prove ourselves successful without the legacy workflow encumbrances we would otherwise have carried.
But it was a disappointment to find out that the team wouldn’t get another go at it: I was asked to revert back to my titular role as ‘cg supervisor’, a euphemism for high-level cg minion, and everyone else knew we would be going back to the same wretched workflow we were trying to change. I don’t know why, but perhaps, now that it had been won, it was status quo ante bellum, and all that.
My contribution was mainly the Realflow water sims and particle effects, the rigging of Gachapin (the character), scene layouts, matchmoving, and pipeline wrangling and custom development.
We had been RND’ing Hybrido sims during pre-production with the (wrong) assumption that the sweet spot for the water sim would be when the character is almost upright. Hybrido did this well, but in the middle of the schedule, we were informed that depicting something coming out of the water in Japan was a no-no (something to do with the population’s sensitivity towards tsunamis, we were told), and the speed of the rising of Gachapin had to be slow, and yet it must depicted as powerful. Thus, we had to throw out weeks’ worth of RND, and ended up fudging and cheating a powerful effect when the character barely rises from the surface. I ended up chucking Hybrido and used a combination of Realwave sims, splash emitters, and Maya’s particles.
The job offered more surprises as conflicting intentions came up surfacing (pun intended). At the last minute, we were asked to come up with a fur solution, scrambled Seekscale to do cloud rendering to help manage the unexpectedly-heavy renders, but still needed to throw back the schedule for a week.
The contributing shot I like best is the water spray shot. It was also the last shot that was approved because it kept on coming back: I couldn’t get it right, for some reason. Then years of experience shouted inside my brain and told me: cheat the shit of it. So I took old water renders, which weren’t even properly tracked to the newest character renders, and put in multiple layers of Trapcode Particular particles, fudged stuff around, and voila: approved!
When I said this job was a difficult road, it was not the work that I was referring to, but the knowledge that I haven’t made a difference. To make a difference lies in constantly making a difference, effecting change; but it becomes impossible if simple opportunities are stunted by the constant retreat to status quo.