The cg aspect to this — falling blueberries on yoghurt in a pot — was another solo job for me. The final comp was a Flame job, though I always try to get 3d renders as close to the actual colours as possible.
There was no pre-production for me as this was just given to me all of a sudden; I would have liked to have gotten lighting information in the set and reference plates. Basically, what we had — not a whole lot — was all that I could work on. Thankfully, there was a close-up shot of the pot as part of the edit, which I used as projected texture back to my cg pot model. This allowed me to get graded colours directly onto the 3d render.
The viscous yoghurt fluid sim was done in Realflow, and rendered in V-Ray because the sub-surface shading there was very easy to get. But the rest of the elements were rendered in LightWave where I could get the most control over how colours were being rendered. This was important because I had also taken a piece of reference footage which showed how the pot looked like under a lighting condition similar to that of the cut. LightWave’s nodal shading system made it easier for me to control the shading of local areas.
This job was won from the strength of another win that was Toyotown: the director was rather pleased with our abilities, and wanted to work with us again. The Toyotown job had been given to me to lead; and I wanted to prove that a good workflow means all the difference to a good-looking product or a bad one. It gave the group an opportunity to prove ourselves successful without the legacy workflow encumbrances we would otherwise have carried.
But it was a disappointment to find out that the team wouldn’t get another go at it: I was asked to revert back to my titular role as ‘cg supervisor’, a euphemism for high-level cg minion, and everyone else knew we would be going back to the same wretched workflow we were trying to change. I don’t know why, but perhaps, now that it had been won, it was status quo ante bellum, and all that.
My contribution was mainly the Realflow water sims and particle effects, the rigging of Gachapin (the character), scene layouts, matchmoving, and pipeline wrangling and custom development.
We had been RND’ing Hybrido sims during pre-production with the (wrong) assumption that the sweet spot for the water sim would be when the character is almost upright. Hybrido did this well, but in the middle of the schedule, we were informed that depicting something coming out of the water in Japan was a no-no (something to do with the population’s sensitivity towards tsunamis, we were told), and the speed of the rising of Gachapin had to be slow, and yet it must depicted as powerful. Thus, we had to throw out weeks’ worth of RND, and ended up fudging and cheating a powerful effect when the character barely rises from the surface. I ended up chucking Hybrido and used a combination of Realwave sims, splash emitters, and Maya’s particles.
The job offered more surprises as conflicting intentions came up surfacing (pun intended). At the last minute, we were asked to come up with a fur solution, scrambled Seekscale to do cloud rendering to help manage the unexpectedly-heavy renders, but still needed to throw back the schedule for a week.
The contributing shot I like best is the water spray shot. It was also the last shot that was approved because it kept on coming back: I couldn’t get it right, for some reason. Then years of experience shouted inside my brain and told me: cheat the shit of it. So I took old water renders, which weren’t even properly tracked to the newest character renders, and put in multiple layers of Trapcode Particular particles, fudged stuff around, and voila: approved!
When I said this job was a difficult road, it was not the work that I was referring to, but the knowledge that I haven’t made a difference. To make a difference lies in constantly making a difference, effecting change; but it becomes impossible if simple opportunities are stunted by the constant retreat to status quo.
In most jobs, I’m glad to be working in the shadows. There are some jobs that I’m really glad to be in the shadows. This is one of them.
Let me be clear: when I say I’m glad to be in the shadows, I don’t mean not being associated with the ad; I’m perfectly fine with the final product (not to say I particularly like it — I’m just fine with it). What I mean about shadows is this: it’s like being inside a tank while looking at a huge industrial fan and above it, tonnes of horse shit ready to drop onto it. When I see trouble, I try to warn off the people. If people don’t listen, I take cover myself.
And remember that this work thread is not just about what you see, but about invisible things behind the work you see. And in this case, what was behind was quite incredible from a production point of view. And I don’t mean incredible in a good way. But let me only say one thing among many things:
We didn’t have the render hardware and software to render Yeti fur, and that we had to sink lots of money to subcontract our rendering; first in the messianic illusion that is cloud-rendering, and second, when that failed to save, in an old-school outsourcing rendering service. The good news is that after two years of waiting (the job was 2 years ago) we have finally incrementally upgraded our software and hardware. There, I wasn’t being that negative was I? Less is definitely more: when you have shit hardware you have to rely on your smarts to get things done. So I’m not choked up about hardware because it helps me shine!
Speaking of shine, there are those that brought the goods on this project. Louis Desrochers groomed the Yeti fur look, and we devised a way to generate wet maps from Maya, since the our Realflow op couldn’t get wet maps from Hybrido sims at the time. We used a combination of ambient occlusion maps that have an Time Echo effect applied in After Affects; that image sequence drove the Yeti maps; I was the one that wrote the script to bake animated ambient occlusion maps to be plugged into AE.
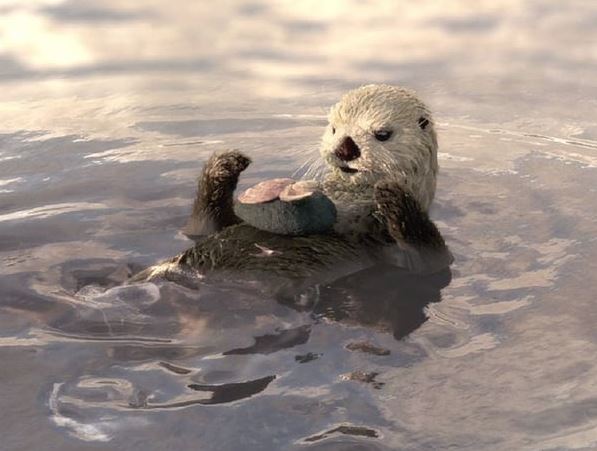
There were so many other people involved in this project, and contributed their part in it: I didn’t even get to rig the otter! That’s a first! Of course, as usual, I was there to clean up the scenes and troubleshooting the most stubborn of the lot. But when the dust finally settled all I wanted to do is forget about it.