As a CG supervisor in a small CG group, I find it part of my job to think of new ways to improve the workflow beyond the scope of the job. Yes, I technically supervise a job, but who technically supervises the group? Indeed, to introduce small improvements after every job is one of the main ideas of what it means to be supervising.
This requires some chin-rubbing. The company I work for retains only a very small core group — less than the fingers of your either hand — so it has been used to hiring freelances for any conceivable job. Part of the problem of freelances is that when the job is finished, you don’t keep the experience they’ve gained from working on the project. Another problem is that no one can guarantee that any freelance will be hired for the next job. These make it difficult to implement an efficient pipeline when, most of the time, most of the crew needs to be indoctrinated to it at the start of the project.
Freelance artists have various ways of working, and they can be required to adhere to certain procedures, but depending on whether or not you’ve worked with an artist before, this is a time-consuming task, characterised with many user errors and frustration that persist throughout the entire project, culminating in freelances finally concluding their contracts — and leaving — just when they have finally gotten to grips with the method. And when a new job begins, you may have to do it all over again.
It is easy enough to suggest scripting tools to user-proof known issues. But to cover a multitude of different possible variances coming from unknown future artists is hard to improve upon when the next job comes along: the same ‘mistake’ is not always done the same way. Fighting fires is part of the work of a TD, but when looking for a workable pipeline, you don’t want to depend on it.
Simplicity was my goal: the more generic the structure, the easier it is to understand. Perhaps the structure, methods, and protocols mimick already-established conventions. Perhaps it becomes incorporated into the host app GUI so it feels more natural to get into.
The shot workflow we now use was first developed through a collaboration between me and Louis Desrochers, who was, appropriately enough, a freelance who had at the time been working with us on a commercial. Later, my colleague Terry Nghe and I would extend this workflow.
I called this workflow and the tools that support it Sandline.
SHOT
There are several facets, but one of them is the simple concept of the shot:
- A shot is represented by a folder, and contains all things unique to that shot; the folder’s name is the shot name
- A shot contains ‘scene’ folders such as ‘anim’, ‘layout’, ‘render’, and others — it is open-ended
- A shot contains a special cache folder to store vertex-cache data, point clouds, meshes, etc.
- A shot contains a special image plane folder
- A shot can be considered a ‘sub-shot’ if the shot folder is nested in the directory structure
- A shot has a definition file which define its frame range, renderer, resolution, render client min/max frame setting, and a description of the scene
- A shot’s definition sits on top of a global project definition
One of the reasons the shot folder came into being is due to our experience in cloud-rendering. We had used the default Maya workspace behaviour in which cache files were written to the project root’s cache data directory. When it was time to upload the data to the cloud service, we would sometimes forget to upload some of the cache files or the scene files because they were being dragged from their two different and respective places.
So why not move all cache files into the same folder since they are only relevant for that shot?
While that solution was an answer a very specific workflow problem — we no longer use FTP-based cloud services when we can help it — the logic behind it was sound: we would have convenient access to all data related to a specific shots.
CACHING
The original Sandline development centered around automating vertex-caching. It does it this way:
- Meshes to be cached are tagged by grouping them in a specially-named node, or by applying custom attributes to nodes
- Namespaces in meshes are treated like directory structures
- Vertex caches are versioned according to the animation scene’s own version
- Any version of the vertex cache be be applied to a scene sans cache nodes, and does this based on name-matching and tagging — the same way it saved the cache
MODELS
An adjunct to caching is models which refer to a scene file that is contains plain geometry and its shading. The idea behind models is to have a geometry with the same point-order as the rig. When the cache is saved off the rig, it is applied to the shaded models version. In this way, it is possible to totally separate the pipeline between animators, riggers, modellers, and shaders.
The models folder is a global folder, which means it can be used by any shot. It also has a ‘versions’ folder where working versioned scenes are worked on. When the models are published, they are promoted to the models directory — and appropriately renamed and stripped off their version number — to be used directly by any scene.
RIGS
Rigs are very much attached to the same idea as models in that that resulting geometry that is used can come from either one, but they must contain the same geometry if the project involves vertex caching (not all projects do). If a rig has been built around a production mesh, and the mesh was modified, the model must be imported back in. Likewise, if, by technical requirements of the rig, the model needed to be modified, those changes must be exported out to a models file to be sorted out by the modeller and shader to conform with the rig file.
Like models, rigs are publish-able: they have a separate ‘versions’ folder where version of rigs are stored. When published, the version number is stripped and promoted to the rigs folder.
MAYA INTEGRATION
I took some pains to integrate, as much as I can, the functions directly into the interface of Maya.
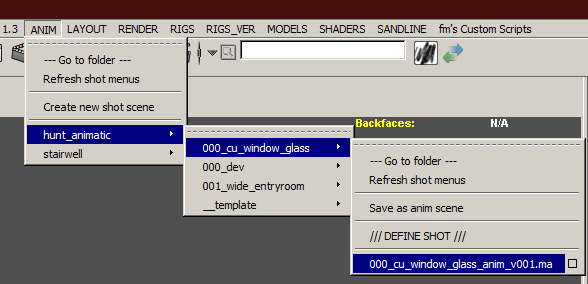
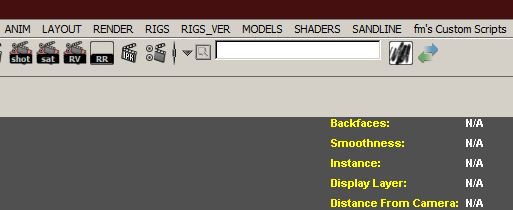 The ANIM, LAYOUT, RENDER menus are references to the subfolder of each shot. But instead of listing each shot on the menu, they appear underneath scene folders:
ROLE-CENTRIC
This might appear odd to most people because you’d normally expect to traverse to your desired scene in the same way you traverse a directory structure. But what’s happening here is that I tried to arrange it from the point of view of what is interesting for the artist in a specific capacity. Indeed, the roles of the freelance is general, but it is always specific for particular time. If you were an animator, you would typically be only concerned with the ANIM folder. If you were responsible for scene assembly or layout, you will cast your attention on the LAYOUT menu. If you were setting the scene up for render, the RENDER menu (and some others). In other words, the menus are arranged according to use, according to role.
And the most important thing about Sandline is that the project leads makes up the roles on a per-project basis: sometimes the LAYOUT role is not relevant, or the LAYOUT role is used as an FX scene. The name of the folder is only a general term, and it is by no means restricted to those roles that has been named as default.
FLEXIBILITY
I work in commercials, which means that almost every project is going to be different from the last one. This means that our workflow — and not least of all our mindset — must be pliable enough to adapt to practical requirements.
For instance, when is it a good time to use the cache system? When there is major mesh deformation happening on high poly counts, or if the scene’s combined complexity — say, multiple characters — complicates render scenes, then a cache system will surely be considered. But when a shot only involves transformations, or if visibility settings are animating (eg attributes that do not propagate in cache data), how much practical benefits would you really get using caches? Or perhaps we’re animating high poly count meshes using transforms (eg mechanical objects); caching those verts to represent transformations instead of using the transformations themselves is a waste of storage and a waste of time.
Also, not all freelances are going to adhere to procedure. More often than not, regardless of how skilled a freelance is, they will do things their way before they do anything else. And there comes a point when they have progressed too far ahead in the scene to repair a dubious workflow, such as forgetting or refusing to reference scenes in certain situations. It has happened too many times. What happens here?
Well, the answer is not in the tool, per se. Of course, I can tell you now that I can come up with several ideas for tools that fixes certain issues, and if time allowed, I would have written those tools. Sure: but the main point of Sandline is the ability to accept those inconsistencies and ignore them; or rather, focus on the basic workflow, to encourage its use. So when a freelance forgets/refuses to reference, the tools don’t hinge on their improper use.
I’ve seen other systems which are rigid, and it was properly rigid due to the straightforwardness of their actual project: there is a strict flow of data, and protocols of usage. In a commercials environment, this doesn’t work, and no one will get away playing that sort of tyranny with freelances; you won’t get the project moving, unless it’s a 4-month long post-production schedule, which doesn’t happen any more.
So, this has been just an introduction to the idea behind Sandline, which is named after Sandline International, a now-defunct private military company. The play is on the idea of ‘freelance’, and this tool was created with that in mind.
That said, freelances who have had the opportunity to use the system, while saying it was ‘cool’, still fell back to their own workflow. Again, this is natural, and almost expected, and is not really that bad. However, in time, I hope to improve Sandline to the point where using it is more seamless, and the measure of its success is how quickly freelances are able to take it in and see immediately its workflow benefits even if they haven’t used the system before.


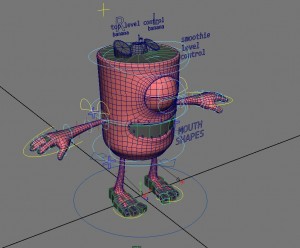
 Then, it was a simple matter of comping, using masks, the mouth cavity and eyes, and the rest of the limbs.