Commercial: Tip Top Popsicle Smoothie

This one was a long, drawn-out schedule. In order to accommodate its numerically-challenged budget, it was thought that the schedule could be extended to several months so that we could put in other jobs in between this one. However, near the end of the schedule, we started picking it up again in earnest, and ended ironically with a quick tempo. Over-extended jobs like these invariably turn out to be rush jobs in the end. This wasn’t the case of procrastination, but the limiting of hours that could be spent on it. Consequently, we were set to do other jobs, and in the end, it could be argued that we had to spend more time on it due to the inefficiency of going back-and-forth different things.

My contribution to this ad was that I helped think out the render strategy, helped the render layer setups, modelled the base of the blender (yay!), troubleshooted character models as it relates to the rig, did the white mist effect using Maya fluids, did a breaking ice simulation that replaced by another simulation, helped shade a few of the elements, and assisted in the initial comping.

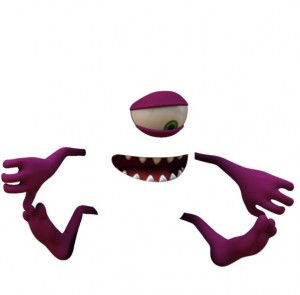
The render strategy was thought out early; we saw the character design as a final art for a poster, and Terry and I worked out the booby-traps in making this character work in 3d. It all boiled down to the refractive properties of the characters especially around the cavities (eg eyes, mouth). If modelled literally, the character would look wrong (and slightly horrific) in many angles, since the glass would refract the dark cavities.

The solution was to make render the glass as though the smoothie content was unbroken by the mouth or eye cavities. This way, the refraction was as seamless as possible.main_v010_BTY_blenderGlass.0039
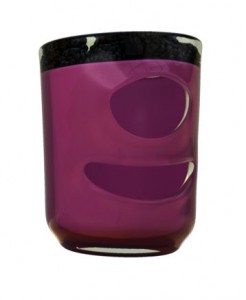
Then, it was a simple matter of comping, using masks, the mouth cavity and eyes, and the rest of the limbs.

main_v010_BTY_blenderBodyParts.0039


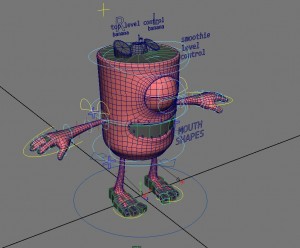
Apart from my usual responsibilities maintaining scene integrity throughout the whole project, one of my other main contribution, was rigging the characters, which I used AdvancedSkeleton with. The rig went through a lot of iterations in its cycle, mainly to do with consideration of the render elements that changed as we moved forward. Towards the end, collision objects were added into the rig to affect the ice that broke apart around the characters.

Because these two characters were identically in many respects, yet had considerable differences, too, I opted to create a generic rig was which featured elements from both characters. The most notable feature are the fruits sitting on top of the characters. A simple boolean switch handled the switch between the ‘pink’ and ‘purple’ characters.

In keeping with Sandline workflow the rigs had to be uniquely named, so I wrote a simple variant export. When a rig change had to be made, the generic rig was modified, and the variant export was done.

One of the workflow strategies we developed in the Mother Earth Pingos ad was using rigging low-resolution meshes into lattices in the rig itself, whose lattice points would be exported as vertex animation. Then we use the same lattice setup in the models file, and put the high-resolution meshes there. This is the approach we used for controlling the high-resolution fruit meshes on top of the character (though, on reflection, a lower resolution would have sufficed).

2016-02-10 12_40_21-Autodesk Maya 2015_ r__3d_2015_07_TipTop_Popsicle_Smoothie_3d_scenes_rigs_PINK_r


Openbox hotkeys

Hotkey stuff for Ubuntu via Openbox, which seems an interesting tool that I hope to look into more closely in the future.

It was quite useful to know how to map LXTask (task manager) to the same combination as Windows. Of course, if I knew that Lubuntu already had a hotkey assigned to it (CTRL+ALT+DEL), I wouldn’t have bothered. Ignorance, after all, can lead to more knowledge than being knowledgeable already. At least sometimes it does.

Some obvious links:

Lubuntu/Keyboard – Community Help Wiki

obkey – Openbox Key Editor – Google Project Hosting


Lubuntu

I had crossed paths with Linux before. It had appealed to me on several levels. One of them was simplicity. The other was the potential of understanding deeply the tools that I would be using. At one point I dabbled with OpenSUSE, Ubuntu, and a few other distros that had been personally recommended to me. But for years I had put off learning it because I had many good reasons to: work, personal projects, so many other applications or tools to learn.

Some years ago I retired my old MSI GX620 laptop running Windows XP. It was a great performer — still think it is — being a gaming laptop and the fact it was running the venerable XP. When I recently needed to install Linux (Ubuntu) to view an OpenFOAM source, I felt the keen desire to dive back into it again.

I tentatively chose to run with Lubuntu simply because of the LXDE; I wanted to make most of my older hardware. With nothing concrete to do in Linux, I went on a installation journey to find all the possible apps that may be of some use to me: GIMP, Blender, FocusWriter, XnViewMP. Installing packages seemed easier with these package managers. I had been clueless the last time I used Linux and was never really aware of them. It almost felt like I was being cheated from a true Linux experience. I did experience a missing library error installing XnView, which prompted me to read about how to properly fish for them. FocusWriter used a PPA that I had to learn how to install as well.

So far it’s been fun learning simple stuff. But I still don’t know what to do with it. I want it to play a bigger part on what I do and if I don’t find something worthwhile, I may never learn it deep enough.

Commercial: Telecom (Jeff the Lizard)

Click to play video.

This is a very old (almost 3 years) project. This was a series of animals being interviewed: a lizard, a hairy pig, a sheep, and a possum. I had worked on the lizard, and the pig, too. We said, “just shoot a pig without hair; pigs don’t usually have hairs anyway”. Then, of all the kinds of pigs to shoot — man alive — they had to shoot a hairy pig. Just brilliant.

For the lizard, I had gone to a recce earlier to the owner of the lizard, and shot my reference photographs there. The reference photographs were primarily used to construct the head model. It was partly used, in combination with the actual graded footage, to texture project back to the model. The lizard was straightforward enough to do, helped by the fact that it wasn’t fidgeting around.

But, on the other hand, the pig, for some reason or other, was being fed by the trainer while shooting — perhaps to keep it from going nuts — and thus kept chewing; its head kept bobbing around. Not that it was an issue of object tracking, but the fact that the pig was supposed to be talking. It was not possible to remove the bobbing even after the mouth was replaced, so the net effect looked like the pig was suffering from some uncontrollable spasm during its interview. I can’t find the video anywhere online; it would have been a good laugh.

Furthermore, because it was a hairy pig, projections didn’t completely do the trick. Poly planes were used to create hairs and break the silhouette to make it work. In my opinion, however, it wasn’t that effective. Unfortunately, there was no time to get into it. I think I spent a week per character and sleeping at the office for several nights.

In this project, we decided to let one artist handle one or two whole characters, as opposed to multiple people going through each animal. However, if memory serves, I did all the head object tracking. And then for the rest, we concentrated on our assigned characters: modelling, rigging, animating, texturing, etc. We also did our work comps, but it had ultimately gone to the Flame suites to be graded in.

Commercial: TAB (Rollercoaster)

TAB_thumb_1
Click to play video.

The ad was shot on several locations; an amusement park called Rainbow’s End, in Fort St in Auckland’s CBD, and in the company’s car park set up for greenscreen.

One of the more exciting bits of this project is that we employed a drone (carrying a Blackmagic) to shoot the rollercoaster when it was doing its slow climb. I helped advise the drone pilot and cameraman on the storyboarded shots. It was quite cool to see a custom drone in operation, to hear the pilot talk about his work, admire the tech and engineering.

So when it was time for the CG to start, it felt a bit boring.

Same ol’, same ol’, as I always say. Yup, someone modelled the rollercoasters; yup, someone modelled digital doubles; yup, I matchmoved; yup: I texture projected a set; yup: they pixel-fucked every frame in the name of Continuity. “Give me a reflection pass, please!” I’ll give you a reflection, all right.

A job is only interesting if the subject matter is worthwhile, or if it’s a technical challenge. Apparently, this was neither. But something’s got to pay the bills, eh?

Unity: Waypoint Scanning

waypoint_scanning

First stages in implementing the waypoint scanning behaviour in waypoints. The idea is when a waypoint is reached, and this waypoint instructs the robot to scan, the robot picks up the waypoint’s scan points. Any number of ‘scan points’ can be specified by parenting transforms under the main scan point object of that waypoint.

The scanning movement is handled by the RobotMovementClass, not the RobotGameClass, though I’m still feeling it out whether that’s the best solution.

On another note, I’ve modified the Game Pause/Unpause behaviour by using SendMessage to NavMeshAgents instead of using if() conditions on their Update() callback; this is mainly because NavMeshAgent functions like Resume() are unintentionally getting called when they’re supposed to sit still!

3400AD: Lookups

So I had been working in Open Office Calc recently, something I didn’t expect to do more than just table up some values and do simple additions. In fact, I got a little deeper than I thought I would.

Normally, I would weigh up the worth of learning something new with the practicality of getting stuff done. Furthermore, ‘getting stuff done’ is about keeping the flow of the work going so that I don’t get stuck, don’t procrastinate, don’t lose my train of thought. So it’s more than just producing new code, or new assets; it’s about striking when and where the iron is hot.

I had been working on tables in Calc because I use lookups for system rolls such as chance-to-hit and defence. Up to this point I had been simply inputting the values by hand (temporarily hard-coding it in Unity). But I realised that I wanted a way to visualise skill improvements as the player levelled up and apply this visualisation to the actual values. This visualisation was simply being able to draw a curve that represents increase of values over another value (eg skills).

2015-12-03 23_52_32-DisguiseStealth.ods - OpenOffice Calc

The basic premise is that I define a curve, whose Y value is from 0-1, and whose X value represents a real number, which, in the case I had been working on, skill level points of the player. (Thinking about it now, I could have further made the curve generic by using 0-1 on the X as well and interpolate the skill points on the table.) When the curve is defined, I take the min/max values that are pre-defined, map the inbetween values using the interpolation code, which derives itself from the curve.

This was just as much to do with automation as it is with experimentation and balancing; it would take too much time to keep tweaking a list of skill values vis a vis a corresponding item for that skill value (eg “how much disguise bonus do we award a player who wears a hoodie at a given skill level?”).

Linear interpolation is quick and dirty, but is simply a compromise. I could have compromised and put more code into Unity to interpolate internally, but that’s just putting more code than required.

So I turned to Calc’s cell formula functionality. I have no deep understanding of Calc, so I relied on someone else’s example to learn from. Though this was not the first time I brushed with polynormals, coefficients, and plotting curves, I’m math-stupid, so it takes me some time to figure it out. This kind of math is something that always interested me, but interest and talent are two different things. I wish I was smarter in math; it would make my life so much easier.

Anyway, after 2 hours looking into the math, I figured out what the example was getting at. With this technique sorted, it frees me up to implement more lookups that require curve interpolation. It’s easier to see what’s going, instead of just looking at numbers. Also, it’s much easier to tweak the system, to balance the game as I continue to develop.

3400AD: Player character models

ninja_suit_2015_12_01_1 trenchcoat_2015_12_01_1 hoodie_2015_12_01_1

Been doing some modelling over the past few days as a break from coding. Actually, I didn’t really want to break from coding, but I felt that I wanted to go back to visualise the game again.

I have to admit that I don’t have a strong theme; I do have a certain style I know I want to hit, but the define ‘style’ is more specific than talking about theme. The game is set it some futuristic landscape but I still have this Bladerunner/Strange Days/Neuromancer grungy cyberpunk idea that keeps me from getting too slick, hence the hoodie and trenchcoat. But the cute little characters provide a contrast that I’m not sure is good or bad.

The ninja suit is a Clancy thing, I think.