3400AD: Set concepts

IMG_20160202_224401
Back alley, Letigus, Sleeper Service; Central District, Slum side
IMG_20160203_001809
Spaceport; immigration booth closeup
IMG_20160204_172304
Unknown country scene; Possibly The Hills
IMG_20160204_234250
The Registers (Registrars); Central District
IMG_20160205_222227
SuperRail and Underground Access
IMG_20160205_170430
The Tower (of Power); Central District

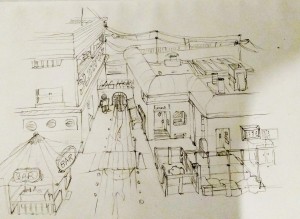
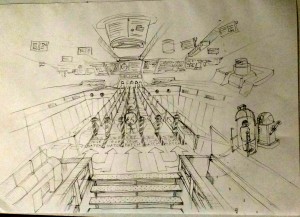
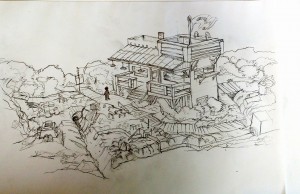
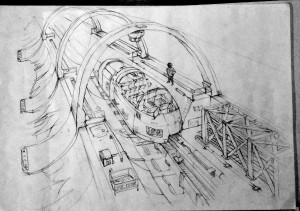
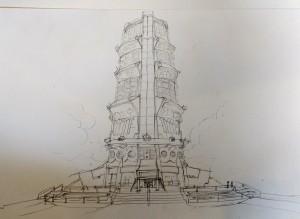
These are some of the concepts I’ve been working on which were based on the initial write-up for the idea of the game. The drawings depict several locations that feature heavily in the game, some of which I had no idea how they looked like until I got down to actually drawing them. Each drawing is different, too; the style of construction, for example, varies from structure. After several drawings it felt that there was a little bit more consistent personality in them. But I still have to work that through.

At the end of the day, it will either be 3D models, or illustrations, and I think I can consolidate the styles then.

These series of drawings began as a test drawings for actual adventure game scenes as I expected them to be rendered on-screen. But because there was a big gap in visualising the game thus far, I strayed from this and started to explore how the world actually looked like.


3400AD: Player character models

ninja_suit_2015_12_01_1 trenchcoat_2015_12_01_1 hoodie_2015_12_01_1

Been doing some modelling over the past few days as a break from coding. Actually, I didn’t really want to break from coding, but I felt that I wanted to go back to visualise the game again.

I have to admit that I don’t have a strong theme; I do have a certain style I know I want to hit, but the define ‘style’ is more specific than talking about theme. The game is set it some futuristic landscape but I still have this Bladerunner/Strange Days/Neuromancer grungy cyberpunk idea that keeps me from getting too slick, hence the hoodie and trenchcoat. But the cute little characters provide a contrast that I’m not sure is good or bad.

The ninja suit is a Clancy thing, I think.

WIP 12 Jan 2011 – Arm and Gun

Last few days have been busy, but not busy with my WIPs. I was trying to get a new cut of my reel out to DNEG has I heard they had some imminent openings. I wanted to send my 2010 reel, but my wife wisely – she’s always wise – to include at least DBX. And so I did. But I also thought of including some of the WIPs here. However, I don’t like putting WIPs into my reel, and none of these models are in a stage that I can show them to someone and not blush. So they stay here until they get up to spec. Here’s my latest progress on the Dante, though: further blocking out of the arms and the M2 machine gun placements.

WIP 012 Jan 2011 – Arm and Gun

Ammo boxes are out behind the upper arm. Belts will go running from the guns to the boxes.

WIP 06 Jan 2011 – Browning M2

Shaded of M2 'beta' model (a.ka. finished pending change of perspective)
Wire of M2 'beta' model
Shaded of M2 close-up
Wire of M2 close-up

I think I ended up with too much detail based on my initial idea. I think the problem is that, unlike production, I don’t have a modelling end goal; there is no particular shot I’m modelling for so it’s tempting to load the model with details. When I was modelling I was maintaining edge sharpness as if the model was going to be viewed close-up. I was justifying all this effort with by thinking that I could present the M2 as its own piece. It is a pity not to aim for a high-quality model in any part of the model, but I am sacrificing everything else for it. It’s very tempting though, simply because when I look at my photographic references I can see so much detail in it; you show me details and I’ll be fighting hard not to incorporate it. I’m a bit obsessive, I’ve learned.

Switched through various music, but Sound of Music (especially Edelweiss) was my company yesterday. This morning I switched to the bootleg CSI soundtrack by John M. Keene – not the official soundtrack: that was okay but when I go looking for soundtracks, I mean soundtracks, not a compilation of various artists.

WIP 04 Jan 2011 – Browning M2

Browning M2 - block out

The ubiquitous Browning M2 is used in many countries, and the Philippines is one of them. The M2 is mounted on both vehicles and helicopters.

For Dante I’ve decided that I’m getting rid of the rotary saw and convert the robot into a gun platform, putting in a slew of M2’s (dual?) on the arms and back and make it look a bit crazy; looking forward to finding how the ammunition belts are going to feed.  Also, hoping to have time to get an M60 (another old one) GPMG sticking out of the cockpit.

The picture above is my block-out stage. Like the other detailed parts of the robot I don’t plan to detail it to the centimetre because it’s too impractical (resource-wise).

WIP 04 Jan 2011 – Arm

I figured I should just redesign the arm as well. Pulled off some pictures of drilling rigs and designed the shoulder based off that. Right now they’re just the usual blocked-out geometry, but it should be easy enough to detail.

Speaking of detail, I spent a day and a half coding a script that would help me with moving edges along other edges consistently. LightWave Modeler doesn’t have a tool like Maya’s Insert Edge Loop where you can insert an edge at an absolute distance from the nearest edge. This gives you a consistent hardness of edge. However, Maya does not have a way to make this metrically consistent as well; you’d still have to eyeball the edge’s hardness. What I did was a script that records a set distance (defined by selecting two verts; the script measures the distance between those two verts), and then selecting an edge, then running either the A-side script, or the B-side script, or the nearest-side script. Running the side script will bring the selected edge towards a particular side (defined by the order of the selection) in absolute distance from that side edge. (When I get a chance to create a plugins page I’ll upload it.)

(Will also be posting another model I’m improving. It’s a Russian T62 battle tank that I did years ago that I want to reassess. I did it in a fashion that is totally unacceptable for me. But I’m planning on using the geometry (which was done reasonably accurately) and just cleaning up the mesh.)

WIP 01 Jan 2011 – Leg

Dante leg WIP (rear view)

Dante leg WIP (front view)

Yup: here comes the leg. Had initial design hesitations not knowing what to make of it. The problem I have, and it was the same problem I had back when I was doing the movie, was proper scaling and believable parts. That’s why the robots in the movie looked more Mechwarrior than Resiklo; it was easier to block out a whole limb by slapping in panelling or ‘nurnies’. I had added construction-looking braces in keeping with the theme, but for the most part the robots in the movie were more high-tech than it should.

But for my redesign the upper leg is a straight rip from a CASE backhoe arm (construction vehicle). The lower legs were derived from the same; a some supports were ‘welded in’. For now I’ve kept the feet as is, but I will most likely keep with the construction vehicle theme throughout most of the leg because the scale of these parts fit with the size of leg: they are robust enough to be believable and the keep everything within scale.

WIP 26 Dec 2010 – Hip

WIP of hip section (front view)
WIP of hip section (rear view)

Redesigned the hip area. Been mulling about this for quite some time and I figured that the closest thing to a hip I can think of is a wishbone type independent suspension for each hip. Placed surrounding frame bars around the engine and then attached the suspension system in the most stable way; I actually did that in reverse: create the suspension, and then the frames. Sometimes I have to work outside-in and inside-out to get the results I want.

At any rate, this is more or less the kind of design I’m gunning for. But, of course, anything can change.

Quit Sigue Sigue Sputnik and went with Big Bill Broonzy at the end.

WIP 26 Dec 2010 – Dante Torso

Dante's torso; rear view

Dante's torso; quarter view

Started on the torso a week ago and just continuing it now. Modified my Pipe script to create, en masse, the tubing. Saved me loads of time. Spent lots of time working out how the the two arm engines were bolted into the body structure. Still need to iron things out; this includes the hip section. Fighting the temptation to go and detail the torso. I have to hold out until I finalise the proportions of my legs and arms.

I think the original design had some hint of ‘design’, but I don’t think I want to make this robot too pretty; in fact I want it to be butt-ugly. I was thinking of re-arming this robot with loads of .50 cal Browning guns – they’re staple among the Philippine military forces – but my wife liked the circular saw, which I had planned to remove. Gosh, what do I do. :-)

Switched to Sigue Sigue Sputnik after looking at all my music; nothing seemed to fit my non-mood.

WIP 24 Dec 2010 – Engine

Done with this engine – for now (until I reassess it again when I put it in context with the rest of the robot). Total polys: 27163; subpatches: 13080. Have to consider this done and get on with the rest of the robot.

WIP of engine as of 24 Dec 2010
WIP of engine as of 24 Dec 2010 (wireframe shaded)

The problem with references of the C240 was, just as many other things, that I couldn’t get into the nooks and crannies of the engine. In several places I had to make things up. But some pictures (below) provided some info on its construction. The references also suggested using rubber tubes instead of the metal ones as pictured in the references I originally posted.

As I mentioned earlier, I think I feel that I’m getting my old speed back. Yesterday I didn’t work at all (just played a game :) ). Today I clocked about 9 to 11 hours of work. A lot of it has to do with my block-out approach, some handy scripts, and OS-hooked hotkeys (via AutoHotkey). I’ve modified my shortcuts in AHK so that I have a slew of oft-used commands such as Select Connected, Select Loop, and few combination commands such as Select Conncted > Hide Unselected, and the Move and Rotate tools all available using modifiers and the pen’s buttons. Some scripts, both my own and 3rd-party are making hard-surface modelling much easier.

Next up: main robot torso: continuing with the jeepney body and placing this engine at the rear of the torso. Already started on the jeepney early this week, actually.