Commercial: Hyundai ix35

This was a sub-contract from an Australian vfx vendor. Terry, with an assistant intern (which was more trouble than help), built rickety structures on the bridge and gave it an gloomy look. My main contribution to this was the front-on car shot on the bridge; I tracked the shot in PFTrack, though it couldn’t completely solve it; I had to hand-track to start of the shot. I modelled and shaded broken old wood that the car was driving on, lit and rendered layers in LightWave using Janus, and test-comped it before sending it to OZ.

I admit that it’s nice to have been involved with an ad that simply looks nice, even though I had absolutely no control or even input on how the other scenes — and the ad as a whole — was going to look like. Implicitly taking credit for being associated with the ad’s look is as easy as simply letting others naturally assume it. Let that not be the case here.

Commercial: Little Red Bear (Gau Yeu)

I worked on this as a freelancer, and it was quite a frantic job. There were so many elements and if a cg forensic psychologist would examine the Maya scenes, they would find that loads of textual clues of how stressful this commercial was.

For all its unbearably fast pace editing and doubtful composition choices, the final renders didn’t look half-bad at all. Of course, I must say that I didn’t contribute to the rendering. :)

My contribution, in fact, was, again, the rigging of the characters; they were actually flat characters (to depict a 2d look), and I rigged them accordingly, which was a crazy thing, actually. I didn’t have a say in the matter, of course. The red bear protagonist was only partly 2d: he had some thickness.

I got a chance to animate some of the characters, like the villainous evil purple guy and the spectators on the stand. But, once again, in the spirit of this thread, to make known what is normally hidden away from the those who view this, my contribution extended far beyond what was nominally given to me. For most of the time, character animation (not limited to this job, of course) had been revised by me, though I couldn’t take credit for it officially because I hadn’t originally been assigned to do it, nor could say it had been mine unless I nixed the original completely, which hardly ever happens. It happens not only in animation, but in every aspect of the job: shading, modelling, rendering, setup, rigging, and even compositing.

Perhaps that’s why it feels much bigger in my mind than what the credits say: to have personally struggled against a stubborn scene that was placed on my lap, and thus produce the grain that otherwise wouldn’t have been produced, impresses upon me the importance of looking beyond the obvious.

Commercial: Smith’s Chips (Mr. Potato Head)

This commercial was a straightforward integration piece. Done back in May 2013, I had flown to Sydney for this job with Leoni Willis, who was the primary on-set supervisor. I came as a supervisor for the cg team, and mainly took HDRs of the scene lighting. There aren’t always that many cases in my experience that requires exacting HDRs — many lighting situations can be faked simply by observing the scene — but in this one, especially the indoor/semi-outdoor scenes, the HDR reflection maps were very effective.

We had shot throughout whole days, and one of the worries I had was changing light conditions. So I took HDRs at regular intervals (2-4 hours apart), depending on whether the direct sun was affecting the intended subject area, and whether or not the ambient had changed drastically, as it does when cloud cover comes and goes. Shooting in this way was much better for the production crews as well, as I only did them when they were well within between takes and they didn’t bothered.  I kept track of the time that scene and takes were taken on the production book. Back at the studio, I organised the HDR sets by their timestamps; I matched that with the final offline correlated to the production book notes.

Besides the set work, I contributed the lighting of many of the scenes, though the shading was mainly developed by the Terry Nghe. I’m usually responsible for both the start and end parts of the job, which means scene setup/layout, and then rendering/managing outputs, fixing odd, tail-end issues, and this job was no exception. Will Brand worked on the mouth rig with me as well as worked up some scenes himself. I worked on the rig fro the rest of the, while Alfredo Luzardo, did most of the animation, though we also got a few others to fill gaps. Leoni did the job of compositing all of our renders.

For all its simplicity and straightforwardness, I really like this commercial because its simplicity looks good, it’s believable, and doesn’t take itself too seriously. To add, I liked the team I was working with.

Commercial: Toyotown Corolla (Sporty Drive)

I normally don’t post the commercial work I do, and my reason for doing starting to do this now correlates to slowing down and appreciating just what the heck I’m doing.

I taught at a vfx/animation school once, and in that setting, I found it hard to quantify the things I did. I get through one year of multifarious subjects, a year of events, grading, failing, meeting, etc. It’s one big blur, and my memory being less-than-stellar, I’d forget all the details. Then one night, my wife and I started talking about the feeling of under-achieving despite feeling so busy. So we sat down to write our achievements, reminding each other what we had done.

I go through many projects, and I start one before stopping another, and so I’m not in the habit of sitting down and appreciating the end of projects. At the end of the year, it’s sometimes quite amazing to the see just how many I go through.

This commercial linked above, dubbed internally as Sporty Drive, was a 3-part campaign, and I was only involved in the first commercial. Three vfx houses contributed to the first commercial; two from NZ, and the main vfx vendor from Japan called VisualMan. It was shot in Queenstown, NZ with a Japanese crew and a local NZ crew. I was there along with two other vfx supervisors from the vendors to vfx-supervise the shoot  It was a great time; I hadn’t been to Queenstown before and the only thing that marred my work was the fact that I hadn’t been sleeping well (one night I didn’t sleep at all).

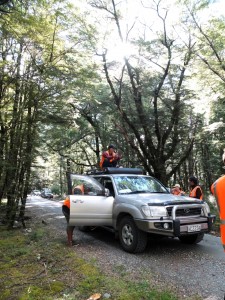
At the set of the airplane-forest shot; DOP at the top of the truck.

I would characterise the shoot as hectic as there were multiple locations that were hours apart, and we had only 3 days to shoot them all. Thankfully, I didn’t need to be in all of those locations and planned accordingly. vfx meetings were held late at night to discuss the storyboard; the director of the ad was not present, and only the DOP was the one heading the shoot.

The post-production side took 3 weeks, we 4 cg ops (that’s including me), and 2 flame ops. We ended up with 19 shots: a full CG sequence of cars racing around a fictional race track set in some dusky environment (originally based around the Speed Racer motif, but morphed into something else as time went by); a CG airplane sequence with a CG tunnel; a collapsing bridge sequence; and finally, some background replacements. Because the CG cars in the whole ad were going to be partly VisualMan’s work and partly ours, we shared the same CAD data and the same HDR. The bridge sequence was rendered in V-Ray, and the rest were rendered with Mental Ray on account of speed, as we predicted we were going to be up the wall in last-minute changes; we weren’t wrong.

Though this isn’t the first commercial I’ve led, it is the first that my current company asked me to ‘drive’, which meant to call (some of) the shots, and ‘direct’ as much as it was in my purview to do so. I enjoyed the experience very much. At the end of it, I felt very pleased at the results we got for so many shots, with so little time. Things, of course, could always be better, but I’ve been at this for so long — sounding like an broken record — that I know situations like these are never ideal. It is, however, much better to appreciate the intrinsic value of the nature of these sorts of projects and use that to learn and re-affirm my experiences.  Of course, I was even more pleased when I was told that on the weight of our work on Toyotown, that the director specifically wanted to work with us again on another of his commercials (ie Kirin Mets Gachapin) few months later on.

One of the main things that I enjoyed about the project was working with a Japanese team. Their culture has always been interestingly foreign to me, and I’ve always been eagerly curious to know how it would be like to work with them. Now I know, and I’m not disappointed; though there were many difficulties with the job, as most jobs do, I appreciated their sincerity, open-mindedness, and collaborative spirit; and the fact that when it’s work time, they don’t shut off.


Janus Macros – Problem of Permutations

Long live Janus. ;-)


I’ve been doing some custom development for an architectural visualisation company in Australia called 3DVIZ recently. During Janus’s commercial phase,  3DVIZ bought a licence. It is usually the case that I don’t know what Janus user actually do with Janus technically-speaking. Few users ask for feature requests, and even fewer ones explain their workflow and how to better improve it through Janus. That’s mainly why Janus developed the way it was: my own personal production needs, and my curiosity in proceduralism.

It is the proceduralism that seemed to draw 3DVIZ into Janus. When I wrote the FOR loop constructs in Janus, it was mostly out of admiration of Houdini and the curiosity of what proceduralism could look like in Janus. No had asked for it, I only had an inkling that I may, just possibly, need it if ever the chance I get into a large-scale project in LightWave. But, if I’m honest, I’ve never actually used FOR loops for any of my commercial projects; none of them were ever big enough to warrant to advantages of using the feature.

When 3DVIZ contacted me for support, I realised that they were using it in a far more advanced way than I personally used it as a TD in commercial work. It was gratifying to see that someone actually had some need to proceduralise their scene management and rendering to that level, and that Janus’s FOR loops actually made all the difference.

3DVIZ approached me again with a permutation problem. From the little I know about it so far, their asset hierarchy is well-organised (ie rigid). And this is the case because they need to be able to render more variants upon variants; from a house, they render parts of the house in varying configurations, each with their own types of materials, and so on so forth.

Part of 3DVIZ’s own request, since they know their problem more than I do, is to enable them to automate scene loading and Janus operations from a more ‘global’ script; as FOR loops handle the breakouts for any given scene, now they want to expand that capability across scenes. The concept is similar to LightWave’s own Render-Q script, where a script resides ‘persistently’ and orders LightWave to do tasks.

The most obvious idea to automate Janus is to allow it to accept macro commands. A ‘controller’ script handles the scene loading, then writes a macro to a file, which contains commands to breakout so-and-so render pass; then signals Janus to receive the macro; when Janus completes the macro, the ‘controller’ loads up another scene in its queue, then writes another macro, and repeats the procedure.

Thanks to the years put into Janus, the implementation of macros was clean, and with some limited testing, the concept works as well as imagined.

However, my main obstacle would be their expansive asset hierarchy. The real challenge is to make sense of it in my head, and design a ‘controller’ script that creates sensible macros that solve 3DVIZ’s particular problem of permutations.


Zombots

I’m working on a little game project. I emphasize that it’s a little project because a lot of consideration has been made to keep it as simple. I want to downplay its significance so it keeps me happy enough to work on it without the added burden of spectral expectations.

I’m working on it with Richard Falla, a friend and co-worker of mine who I’ve also worked with on different commercial projects in Toybox. During one lunch time, Richard, Terry, and I discussed how many 5 year-old kids we could take out before we got taken out ourselves. This light-hearted pondering over violence on little kids captured our interest, and became the basis, the seed, of this game.

At first, we were both decided on doing it as a top-down or isometric sprite-based 2D game. I had been working with Construct 2 for some time doing an RPG experiment (read: Shelved project) and thought it would be a good place to start. Richard drew up some animated sprites for me to test with and although I got something rudimentary thing working, I quickly realised something. The concept of Zombots was getting a mob/crowd of zombie robot kids attacking the player. C2 did not have anything — that I knew of — related to crowd-based pathfinding and AI that I can employ readily and be able to tweak as needed. I wasn’t interested — nor qualified — in coding a scratch-built AI pathfinding system in a C2 (HTML5) JavaScript environment, I quickly lost interest and gradually let the game scuttle up The Shelf.

Then some months later, Richard and I went back to talking about it. Unity cropped up in our conversation because I had dabbled in Unity before — as had Richard — and I was quite aware of its NavMesh/pathfinding features. I knew that among all of the other game engines out on the playing field, Unity would arguably have the most user-friendly implementation (for my coding background, that is). But would we get the 2D/illustration-like feel in 3D? In the absence of any real solution in C2, or similar game makers, and that Unity was freely available for personal use, we decided ‘why the hell not?’ Like I said, I had only dabbled in Unity never having enough reason to dig further. But this time, the momentum seemed to keep building.

Richard provided a proxy character model that I rigged it in AdvancedSkeleton; I did some idle and run animations, exported it via FBX, and from there, things progressed smoothly. Richard pointed to me a Unite conference tutorial on game-making which reflected many aspects of what we intended our own game to be. (Looking at it now, however, it doesn’t seem that similar.) I followed the tutorial most of the way, and more than a refresher course, I got to understand better how things worked in Unity.

I must admit, however, that this game isn’t the kind of game I’ll be picking up on Steam. I tend to play games like The Division, or Splinter Cell, or something with a serious theme, or something retro. For those who know me, a zombie game — be it robotic or organic zombots — of all things, wouldn’t be readily associated with me. But I think that’s what makes me less invested and more methodical in my approach. I see the game as a big program full of yet-undiscovered bugs, as a simple but (hopefully) entertaining system of ropes and pulleys. I can approach this game from a purely technical standpoint, and a purely creative one, because my own desires doesn’t get in the way.

I’ve been documenting my progress in a private developer’s diary, and perhaps after the alpha is ready, I’ll be more encouraged to make different aspects of the development more public. As it is, I’ve never done a game before, so the only professional claim I have to this is the fact that I’m working in 3d, and working with code; that being the case, I keep my enthusiasm to myself to prevent it from leaking out. It’s like keeping the warmth in by not opening the window.


Over Time

I think that when I was younger all that mattered was doing a good job. As I grew older, I wondered if I was missing something. I don’t mean promotions or salary raises. I thought of Time, that forever deal that no one gets to turn away from. I lie to my side at night and, before I go to sleep, I hear my heart beating under me. I wonder why I feel it more keenly now. I think of the day I finally stop trying to sleep and die. I wonder if everything I’ve done since would have been worth it, even just for me.

The strife of overtime is more than just about money, or boredom, or even health, or all the bad reasons why we burn Time this way. Rising onto the surface is waste: Life wasted on things I don’t love; on vanity, on mediocrity, on lusts, on fear.

I love differently, I love different things, as I bear Time. Now, the world has become unintelligible and malicious, and I feel as though I am being born yet again unto myself, coming out of a mystical womb with hysterical infantile cries that I myself don’t hear. The pain of a rebellious newborn — never known — is now remembered; dissidence grows desperately, yearning never to die with an old heart.

If ever I run free, in the present I will live, and all my moments will be as aeons are: more Time than I can ever hope to ask for.


Cold Light

The Cold was a short poem I wrote in front of my workstation one night. Fittingly, I wrote it in my code editor.

The poem has given me much to remember, and through remembrance it holds me to account for all my present moments. It is where this blog’s name comes from, although at the time, I didn’t really consider it beyond the poem’s literal imagery.

The poem talks about dying in the middle of any conceivable night, when the world has gone to bed, except you (me), and the city lights, the office fluorescents still wave-pulsating, are droning a tiny sound. When death comes over, there is no noise above the silence, so that all is silent, and no one hears you, or sees you, depart.

I remember that one cold night. I was surrounded by the darkness, which I preferred when I worked late. The air was air-conditioned cold against the skin of my night body — a body that loses heat in expectation of sleep. I looked to my right and saw the dead streets, wet after the rain, yellow-orange under lights. I looked down to my hand resting on the keyboard. I saw the monitor drape its light over me. Underneath the office table, lit blue by the computer’s power light, was my sleeping bag.

I have cause to remember this poem, because I always come to the moment of wanting to write it again. Reading it, I find nothing needs to be added, nothing needs needs to be trimmed. It says everything I need to feel at the moment. To read about a quiet death in a quiet room filled with computer fans humming, fills me with an alarm that sounds at the back of my heart. I can hear a humungous gong, a devil screaming in another plane. But I see no vision except the physical sparkles of particles and aura around my eyes, which streak back and forth causing me to turn: is someone there?

The devil is screaming. Or is it my voice I’m hearing?

If I go on like this, I will die much like how I describe it myself. No one will close the lights before my eyes shutter themselves from knowledge of them. I will inherit this sadness in passing — forever. This cold light is the sky of a poor life. Only in leaving this room can there be hope of better chapters.


Did you know? # 2

Sometimes the perspective camera in Maya rotates (ie tumbles/orbits) around its own pivot point when the desired behaviour is to rotate around an object. When pressing ‘f’ does not fix the issue, or when trying to manually reset the centerOfInterest attribute of the camera, the best way to fix this problem is by selecting an object, and then on the viewport menu: View > Look at selection.

Sandline

As a CG supervisor in a small CG group, I find it part of my job to think of new ways to improve the workflow beyond the scope of the job. Yes, I technically supervise a job, but who technically supervises the group? Indeed, to introduce small improvements after every job is one of the main ideas of what it means to be supervising.

This requires some chin-rubbing. The company I work for retains only a very small core group — less than the fingers of your either hand — so it has been used to hiring freelances for any conceivable job. Part of the problem of freelances is that when the job is finished, you don’t keep the experience they’ve gained from working on the project. Another problem is that no one can guarantee that any freelance will be hired for the next job. These make it difficult to implement an efficient pipeline when, most of the time, most of the crew needs to be indoctrinated to it at the start of the project.

Freelance artists have various ways of working, and they can be required to adhere to certain procedures, but depending on whether or not you’ve worked with an artist before, this is a time-consuming task, characterised with many user errors and frustration that persist throughout the entire project, culminating in freelances finally concluding their contracts — and leaving — just when they have finally gotten to grips with the method. And when a new job begins, you may have to do it all over again.

It is easy enough to suggest scripting tools to user-proof known issues. But to cover a multitude of different possible variances coming from unknown future artists is hard to improve upon when the next job comes along: the same ‘mistake’ is not always done the same way. Fighting fires is part of the work of a TD, but when looking for a workable pipeline, you don’t want to depend on it.

Simplicity was my goal: the more generic the structure, the easier it is to understand. Perhaps the structure, methods, and protocols mimick already-established conventions. Perhaps it becomes incorporated into the host app GUI so it feels more natural to get into.

The shot workflow we now use was first developed through a collaboration between me and Louis Desrochers, who was, appropriately enough, a freelance who had at the time been working with us on a commercial. Later, my colleague Terry Nghe and I would extend this workflow.

I called this workflow and the tools that support it Sandline.


SHOT

There are several facets, but one of them is the simple concept of the shot:

  • A shot is represented by a folder, and contains all things unique to that shot; the folder’s name is the shot name
  • A shot contains ‘scene’ folders such as ‘anim’, ‘layout’, ‘render’, and others — it is open-ended
  • A shot contains a special cache folder to store vertex-cache data, point clouds, meshes, etc.
  • A shot contains a special image plane folder
  • A shot can be considered a ‘sub-shot’ if the shot folder is nested in the directory structure
  • A shot has a definition file which define its frame range, renderer, resolution, render client min/max frame setting, and a description of the scene
  • A shot’s definition sits on top of a global project definition

One of the reasons the shot folder came into being is due to our experience in cloud-rendering. We had used the default Maya workspace behaviour in which cache files were written to the project root’s cache data directory. When it was time to upload the data to the cloud service, we would sometimes forget to upload some of the cache files or the scene files because they were being dragged from their two different and respective places.

So why not move all cache files into the same folder since they are only relevant for that shot?

While that solution was an answer a very specific workflow problem — we no longer use FTP-based cloud services when we can help it — the logic behind it was sound: we would have convenient access to all data related to a specific shots.


CACHING

The original Sandline development centered around automating vertex-caching. It does it this way:

  • Meshes to be cached are tagged by grouping them in a specially-named node, or by applying custom attributes to nodes
  • Namespaces in meshes are treated like directory structures
  • Vertex caches are versioned according to the animation scene’s own version
  • Any version of the vertex cache be be applied to a scene sans cache nodes, and does this based on name-matching and tagging — the same way it saved the cache


MODELS

An adjunct to caching is models which refer to a scene file that is contains plain geometry and its shading. The idea behind models is to have a geometry with the same point-order as the rig. When the cache is saved off the rig, it is applied to the shaded models version. In this way, it is possible to totally separate the pipeline between animators, riggers, modellers, and shaders.

The models folder is a global folder, which means it can be used by any shot. It also has a ‘versions’ folder where working versioned scenes are worked on. When the models are published, they are promoted to the models directory — and appropriately renamed and stripped off their version number — to be used directly by any scene.


RIGS

Rigs are very much attached to the same idea as models in that that resulting geometry that is used can come from either one, but they must contain the same geometry if the project involves vertex caching (not all projects do). If a rig has been built around a production mesh, and the mesh was modified, the model must be imported back in. Likewise, if, by technical requirements of the rig, the model needed to be modified, those changes must be exported out to a models file to be sorted out by the modeller and shader to conform with the rig file.

Like models, rigs are publish-able: they have a separate ‘versions’ folder where version of rigs are stored. When published, the version number is stripped and promoted to the rigs folder.


MAYA INTEGRATION

I took some pains to integrate, as much as I can, the functions directly into the interface of Maya.
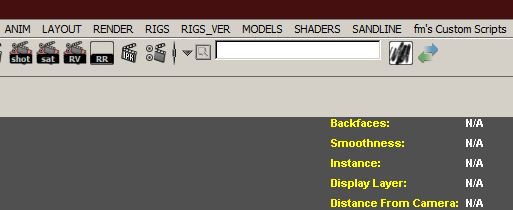
2015-05-16 21_26_19-Autodesk Maya 2013 x64_ untitled_The ANIM, LAYOUT, RENDER menus are references to the subfolder of each shot. But instead of listing each shot on the menu, they appear underneath  scene folders:
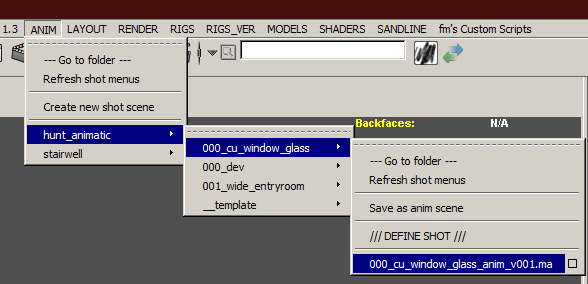
2015-05-16 21_29_21-Autodesk Maya 2013 x64_ untitled_

ROLE-CENTRIC

This might appear odd to most people because you’d normally expect to traverse to your desired scene in the same way you traverse a directory structure. But what’s happening here is that I tried to arrange it from the point of view of what is interesting for the artist in a specific capacity. Indeed, the roles of the freelance is general, but it is always specific for particular time. If you were an animator, you would typically be only concerned with the ANIM folder. If you were responsible for scene assembly or layout, you will cast your attention on the LAYOUT menu. If you were setting the scene up for render, the RENDER menu (and some others). In other words, the menus are arranged according to use, according to role.

And the most important thing about Sandline is that the project leads makes up the roles on a per-project basis: sometimes the LAYOUT role is not relevant, or the LAYOUT role is used as an FX scene. The name of the folder is only a general term, and it is by no means restricted to those roles that has been named as default.


FLEXIBILITY

I work in commercials, which means that almost every project is going to be different from the last one. This means that our workflow — and not least of all our mindset — must be pliable enough to adapt to practical requirements.

For instance, when is it a good time to use the cache system? When there is major mesh deformation happening on high poly counts, or if the scene’s combined complexity — say, multiple characters — complicates render scenes, then a cache system will surely be considered. But when a shot only involves transformations, or if visibility settings are animating (eg attributes that do not propagate in cache data), how much practical benefits would you really get using caches? Or perhaps we’re animating high poly count meshes using transforms (eg mechanical objects); caching those verts to represent transformations instead of using the transformations themselves is a waste of storage and a waste of time.

Also, not all freelances are going to adhere to procedure. More often than not, regardless of how skilled a freelance is, they will do things their way before they do anything else. And there comes a point when they have progressed too far ahead in the scene to repair a dubious workflow, such as forgetting or refusing to reference scenes in certain situations. It has happened too many times. What happens here?

Well, the answer is not in the tool, per se. Of course, I can tell you now that I can come up with several ideas for tools that fixes certain issues, and if time allowed, I would have written those tools. Sure: but the main point of Sandline is the ability to accept those inconsistencies and ignore them; or rather, focus on the basic workflow, to encourage its use. So when a freelance forgets/refuses to reference, the tools don’t hinge on their improper use.

I’ve seen other systems which are rigid, and it was properly rigid due to the straightforwardness of their actual project: there is a strict flow of data, and protocols of usage. In a commercials environment, this doesn’t work, and no one will get away playing that sort of tyranny with freelances; you won’t get the project moving, unless it’s a 4-month long post-production schedule, which doesn’t happen any more.


So, this has been just an introduction to the idea behind Sandline, which is named after Sandline International, a now-defunct private military company. The play is on the idea of ‘freelance’, and this tool was created with that in mind.

That said, freelances who have had the opportunity to use the system, while saying it was ‘cool’, still fell back to their own workflow. Again, this is natural, and almost expected, and is not really that bad. However, in time, I hope to improve Sandline to the point where using it is more seamless, and the measure of its success is how quickly freelances are able to take it in and see immediately its workflow benefits even if they haven’t used the system before.