INTERFACE WALKTHROUGH
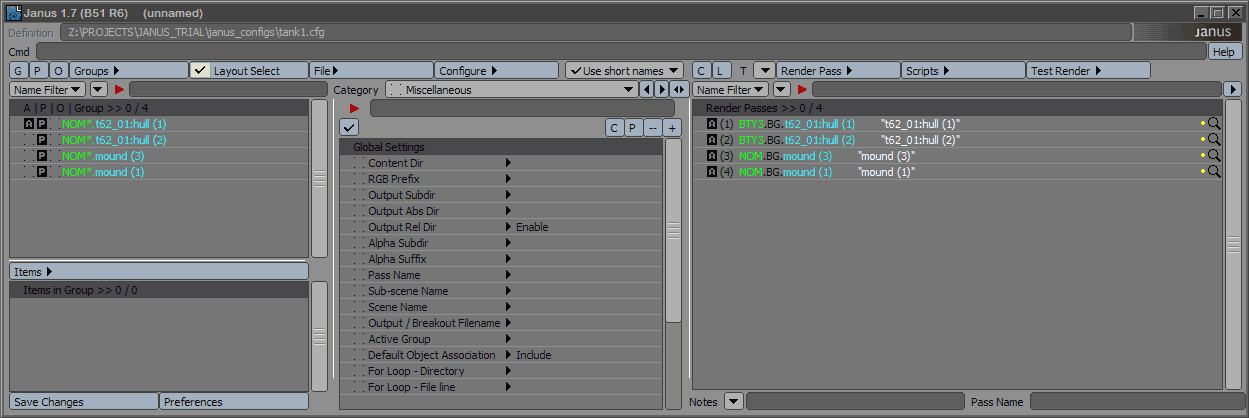
This section looks at the GUI of Janus. Here is a screenshot and pointers to areas of importance. Click on any part of the screenshot to see a description.
Definition File
The definition line shows you the current definition file being used by the current scene. A definition file stores all information regarding the groups, the items in the groups, the commands, and the global settings. This is basically the file that contains all of your render pass information
The definition file is not stored with the scene because it is more flexible this way. This is especially beneficial if working on scenes that share, more or less, the same kinds of passes.
File Menu
This menu manages definition files and offline files. You can work with definition files by loading, saving, exporting, or importing them in and out of your current definition. You can also load and unload offline files, and access recent scenes (based off the Janus_MAINCONFIG file)
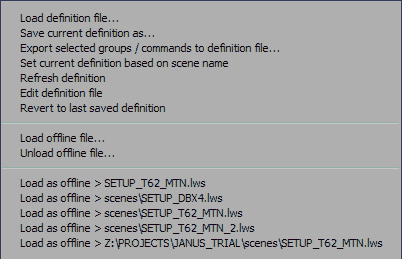
- Load definition file - opens up a dialog asking what definition file you would like to load. If you specify a definition file that does not exist, Janus assumes you are creating a new definition file.
- Save current definition as - saves the current definition with another name
- Export selected grioups / commands to definition file - exports only selected groups and render passes to a definition file
- Set current definition based on scene name - uses the current scene name and uses that as the definition file
- Refresh definition - updates the lists with the current definition
- Edit definition file - opens the definition file in a text editor
- Revert to last saved definition - reverts to the last-saved definition file
- Load offline file - loads a .lws file as an offline file
- Unload offline file - unloads the currently loaded offline file
- Load as offline - a list of recent scenes that you can quickly pick to load as an offline file
CMD Line
The CMD line is the field that shows you the selected render pass's command. You may use the CMD line to directly change settings, even several render passes at the same time.
Layout Select
This selects items in Layout whenever you select groups in the Groups list.
Scripts Menu
Handles the execution, addition, and removal of scripts. Janus comes with several scripts and they are featured in the Feature Walkthrough section.
Miscellaneous Options
These options offer certain behavioral changes within Janus.
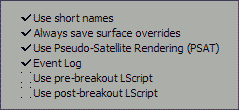
- Use short names - shortens the display name of the render passes in the render pass list.
- Always save surface overrides - will force Janus to apply surface overrides on those objects which have been directed to have overrides. Sometimes, you would want to turn this off to speed up the Janus breakout process, especially if you know that the surface overrides are exactly how you want them to be. In this way, when it is unchecked, Janus assumes that the overrides are correct, and will not replace the surface-overridden object.
- Use Pseudo-Satellite Rendering (PSAT) - PSAT uses an existing render farm to distribute a single frame render (render regioning). ImageMagick montage.exe must be installed and identified in the Preferences panel.
- Event Log - enables or disables the use of the Event Log.
- Use pre-breakout LScript - if checked, the pre-breakout LScript (defined in the Preferences) will be executed automatically just before breakout.
- Use post-breakout LScript - if checked, the post-breakout LScript (defined in the Preferences) will be executed automatically after breakout has completed successfully.
Group List
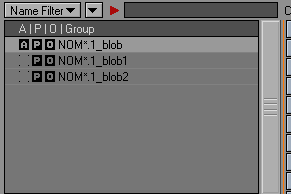
The group list shows all existing groups in the definition file. This may or may not reflect the currently loaded scene, so it is the user's responsibility to assign the proper definition file. The group list contains three columns, the Propagate, Override, and Name columns. If the 'P' symbol is highlighted, it means that the group is a propagate group. The asterisk (*) that is after the group type also denotes that it is propagate type. If the 'O' symbol is highlighted, it means that there are manual user overrides applied to the group.
Groups Menu
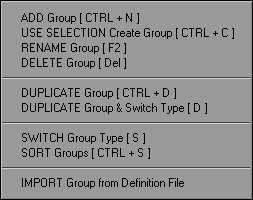
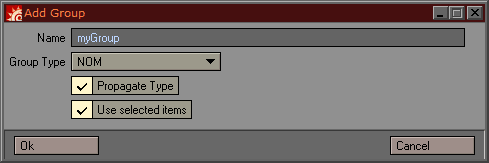
- ADD Group - add a group using a dialog box.
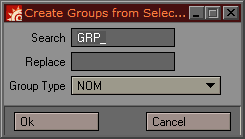
- USE SELECTION Create Group - adds a group based on the selected items in Layout. A search-and-replace function is added so that if you have a naming convention for your items you may strip or replace them before they are added as groups in Janus. An example: if I have GRP_ALIEN which is a null the is the parent of all items related to my ALIEN character, then I search-and-replace "GRP_" with "" (e.g. nothing) so that I will end up with a group called NOM*.ALIEN.
- RENAME Group - renames a group.
- DELETE Group - deletes a group. You may use the Delete key, too. Note, however, that Janus keeps track of the last selected list. If you selected the group list last and press Delete it will assume that it is from the group list you want to delete.
- DUPLICATE Group - duplicates a group and increments it (e.g. identical names are not allowed in Janus where they share the same type)
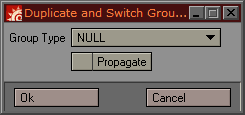
- DUPLICATE Group & Switch Type - duplicates a group and then switches the type. Useful if you want to simply create another version of the same group. This is faster than creating a group and assigning items into them.
- SWITCH Group Type - switches the group type to another type.
- SORT Groups - sorts the group list in either descending or ascending order.
- IMPORT Group from Definition File - imports group data from another definition file.
- EXPORT Groups | Render Pass - export the current set of groups (or commands) to a file.
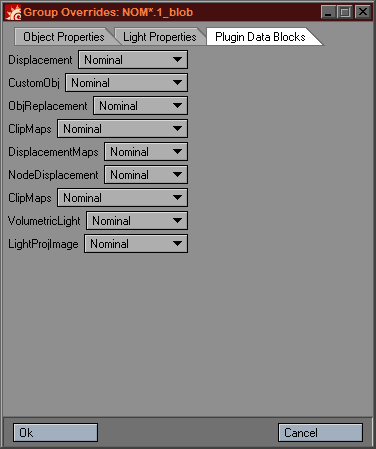
- Group OVERRIDES - goes to the group overrides dialog. The group override dialog has three pages:
- Object Properties - related to all properties for mesh or null item.
- Light Properties - related to all properties for lights.
- Plugin Handler / Data Blocks - related to Plugin settings and Data Blocks like Clip Maps, Displacement Maps, Node Displacement, APS Render Texture, Light Projection Image.
"Quick Change" Group Properties
There are three controls that relate to changing group properties. There is the 'G' popup which is used to change the group type. It will display the list of registered group types. There is also the 'P' popup which is used to quickly enable or disable the Propagation property of the selected groups. The 'O' button will bring up the Group Overrides dialog box.
- G - Group Type (changes selected groups to this type)
- P - Propagation (enables or disables Propagation in selected groups)
- O - Overrides (opens up the group overrides dialog

Items in Group List
The Items in Group list shows the items contained in the group.
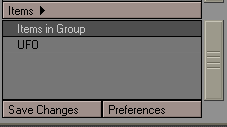
Items in Group Menu
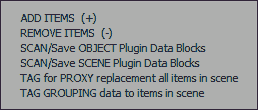
- ADD Items - adds selected items (in Layout) to the currently selected groups. Multiple groups allowed.
- REMOVE Items - remove items from the group.
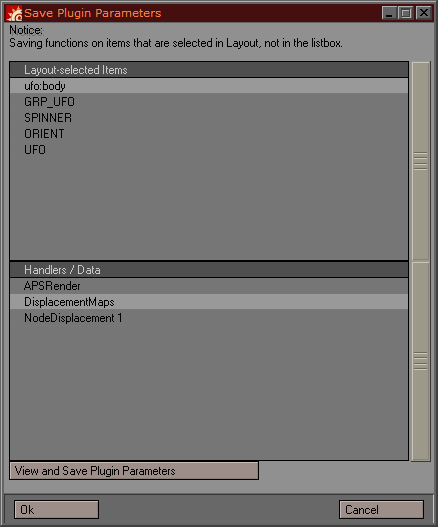
- SAVE Object Plugin Parameters - detects and saves currently-selected items' item-related plugin parameters or data blocks.
- View and Save Plugin Parameters - you are presented with the data block you have selected. You cannot edit this block, only read it. If you input a name in the Save As field, and press OK, the data is saved in the Janus_PLUGINDEF.cfg that is located in your currently-set content directory.
-
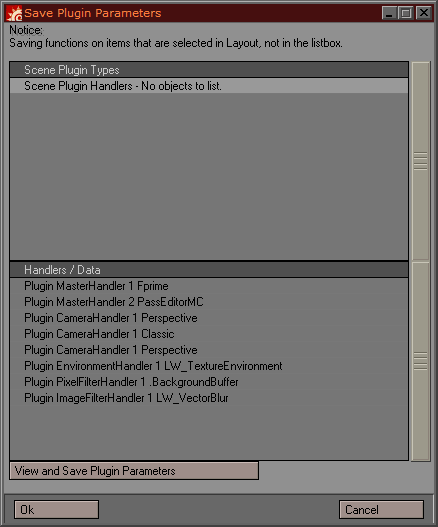
- SAVE Scene Plugin Parameters - detects and saves scene plugins (e.g. VolumetricHandler, PixelFilterHandler). All data blocks saved will be located in the Janus_SCENEPLUGINDEF.cfg file located in your currently-set content directory.
- TAG for PROXY replacement all items in scene - tags all items with their filenames to prepare them for use in Janus's proxy system.
- TAG GROUPING data to items in scene - tags all items with their grouping information to prepare them for use in Janus's offline breakout method.
Command List (Render Passes List)/ Thumbnail Command List
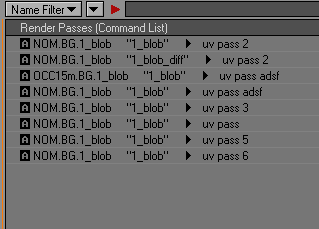
The command list (aka Render Passes List) is the list of render passes. If 'Use short names' is checked then only the command type, the layer type, and the target group parts of the command are shown. Each render pass is displayed with some useful information about its data. Beginning of the left-to-right, these are indicators displayed:
- 'A' icon -this is the 'associated' indicator; if this render pass contains associated groups, this will be visible. If the render pass has no associated groups - which, in turn, signifies that it will render nothing - then this will be blank.
- '(#)' - this is the index number of the render pass
- Render pass command line - this is the render pass command. Note they are colour-coded and these colours can be changed in the Preferences.
- Render pass name - enclosed in quotation marks is the render pass name
- Notes - a bullet point follows the notes of the render pass
- Render status indicator - a magnifying-glass icon changes colour when the user executes a render status check.
The render pass's name is enclosed in quotation marks. Notes, or comments, are also shown at the right of a carat symbol. You may add or modify notes in multiple commands at once. Use the Notes field below.
Janus also has an enhanced thumbnail command list 'mode' accessible by clicking on the button on the upper-right hand side of the list. A thumbnail of a recently test-rendered pass is displayed along with the render pass information. Also, a context menu is accessible via right mouse button (RMB) and offers a subset of the commonly-used commands of the render pass menu, including the ability to re-preview the last test render of a selected pass.
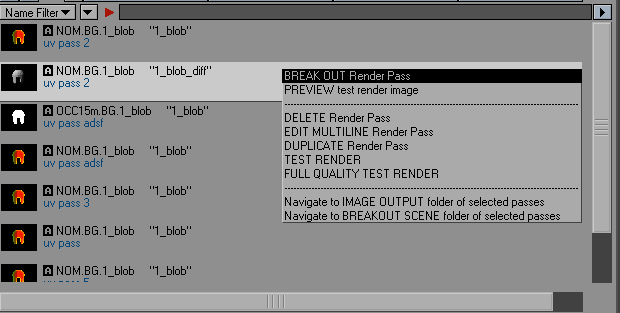
Note that a test render can be executed by SHIFT + double clicking on a thumbnail list entry.
Category
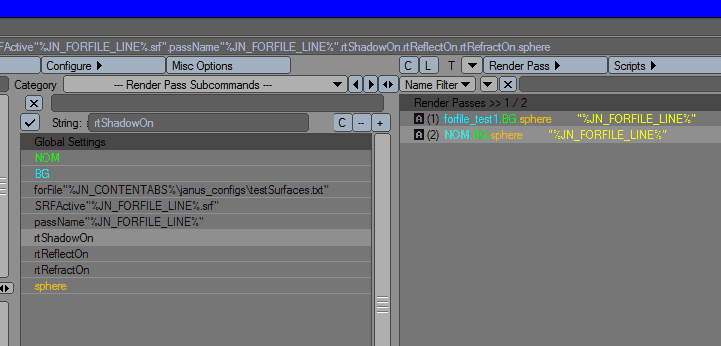
The category popdown arranges the settings into groups similar to that found in LightWave. A tick mark on any of these categories denotes that a global setting belonging in that indicated category is activated. Subcommands are arranged according to these categories.
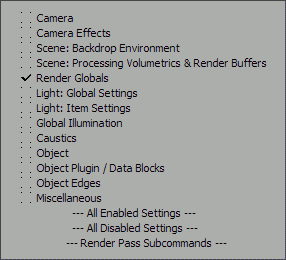
The last three categories are special. If you select either All Enabled Settings or All Disabled Settings Janus will filter out the enabled and disabled settings respectively. You can achieve the same effect by using the special syntax for the category filter.
If you choose Render Pass Subcommands the list will filter in all subcommands that the currently selected render pass contains.
Switch Category
The left and right buttons enable you to cycle up or down the category list, while the double-arrow keys toggle between the last selected category and the Render Pass Subcommand category. You can assign a hotkey for this; the hotkey is Category Up, and Category Down.
Category Filter
The category filter allows you to type in a name of a parameter or the subcommand name, and the list updates to match. For example, if you type in 'start frame' or 'sf', the 'Start Frame' setting will be filtered. A partial name can also be supplied and will match all setting containing the string.
Typing in + means that you are filtering in all the activated settings. Typing in - means that you are filtering in all deactivated settings.
Enable Menu
The enable menu is a popdown that applies the enable or disable function to the selected global settings.
Value Input
The value input changes type depending on the currently selected parameter in the global settings list. When you select the Render Pass Subcommands category inputting a value will automatically replace the value in the subcommand.
Copy-paste Subcommands
Use these buttons to copy and paste subcommands. This feature is most useful in the Render Pass Subcommands category where you can copy and paste over subcommands from one render pass to another.
Add Subcommand
This button functions as an add, cycle, and remove subcommand feature. If you have a global setting selected, pressing on this button will cycle through the Both, Active, Other subcommand modifiers (if applicable), then remove the subcommand. If the selected subcommands do not have these modifiers then the button simply acts like a toggle switch: add and remove.
If the Render Pass Subcommands category is active, this control turns into a menu, and you have the option of editing the subcommand (though this is already done interactively when you edit the value input field), or removing it.
Notes Field
The notes field allows you to put in comments or notes for a render pass to make them more readable. The notes field support a unique kind of variable called subcommand variable which allows you to refer to the value of a subcommand of a specific pass. For example, if you wanted to know the frame range of a particular render pass, you can input the following into the notes field:
Frame Range: sc:sf: - sc:ef:
And assuming that the range was set in the global settings or as subcommands, that translate to:
Frame Range: 1 - 60
To break down the syntax, it is 'sc' followed by a colon (:), then the subcommand name, and then terminated by another colon:
sc:<subcommand>:
This subcommand variable feature allows you to create templates that you can reuse by saving them as notes presets. Notes presets can be either global, which is stored in the Janus_FilterPresets.txt in the Janus_SupportFiles folder, or Janus_FilterPresets.txt that is stored in the project configuration folder.

Pass Name Field
The pass name field is a quick way of changing your pass name; just input the pass name and Janus will take care with the appropriate subcommand.
Render Pass Menu
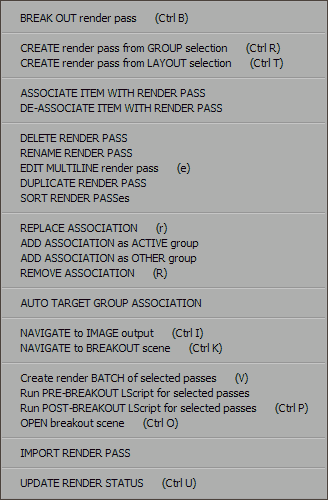
- BREAK OUT Render Pass - processes the command and breaks out (exports) the selected render pass(es) into scene files.
- CREATE Render Pass from GROUP Selection - creates a render pass based on the group selection you have in the Groups List. This will prompt you a Create Render Pass From Selection dialog.
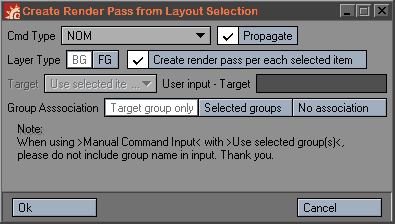
- CREATE Render Pass from LAYOUT Selection - creates a render pass based on the selection you have in LightWave. This function not only makes a render pass from the selection, but automatically creates a group for you and associates the group. This will prompt you a Create Render Pass From Selection dialog.
- Create Render Pass from Selection dialog
- Cmd Type: specify the default command type that will be used for this render pass.
- Propagate: specify if propagation should be turned on or off.
- Layer Type: specify the default layer type
- Create render pass per each selected item: check this if the selection you've made in LightWave was intended for each object to be in a separate pass. If you uncheck this you effectively group all of your selected items in one group.
- Target
- Use first selected group name as target: uses the first group's name as the name of the target group
- Manually specify target: user specifies the explicit name.
- Group Association
- Target group only: only the target group is associated with the render pass.
- Selected groups: all selected groups are associated.
- No association: no default association is done.
- ASSOCIATE ITEM WITH RENDER PASS - takes the selected item in Layout and associates it to the render pass based on options. If you use this command Janus manages the creation of groups.
- Propagate - includes the selected items' children with the association
- Associate item as - the selected items can be associated as a renderable (active group) item, or a contributing (other group) item.
- DE-ASSOCIATE ITEM WITH RENDER PASS - forcefully de-associates selected items from the render pass. If you use this command Janus manages the creation of groups; oftentimes this command will create NULL groups so that items are forcefully de-associated.
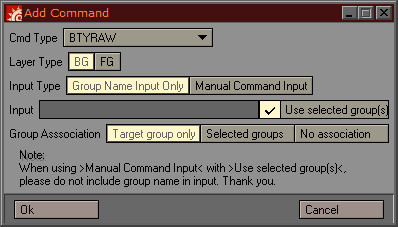
- ADD Render Pass - add a new render pass or command.
- Cmd Type - lists all registered command types for you to choose one.
- Layer Type - either BG or FG.
- Input Type - if Group Name Input Only it will interpret the string you type in the Input field as being that of a group's name. If Manual Command Input, the Input field is interpreted as a whole command.
- Use selected group(s) - only available if you have selected a group prior to opening this dialog. If checked, it will create multiple render passes for each selected group. It does not require you to type anything in the Input field.
- Group Association - sets default association. If Target Group Only is selected, then it will associate the render pass only to the group it was created for. If Selected Groups is selected, then the render pass associates itself with all of the selected groups.
- DELETE Render Pass - removes a render pass. The Delete key may also be used.
- RENAME Render Pass - renames a render pass, though it is preferable to simply use the CMD field to modify any settings.
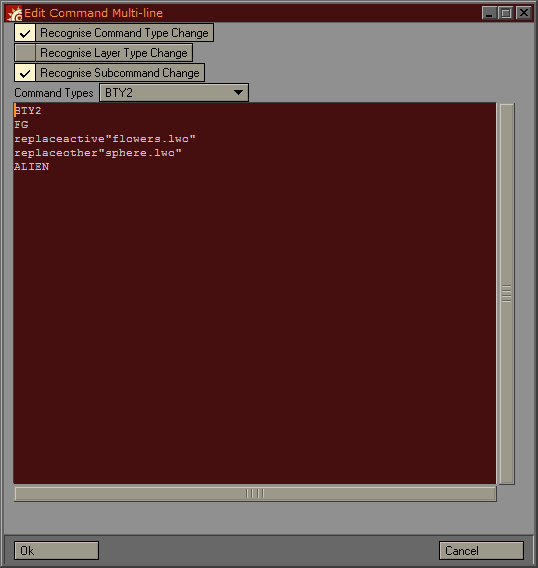
- EDIT MULTILINE Render Pass - brings up the multiline editor which may make it easier for some people to read out the commands in a line-by-line fashion.
- Recognise Command Type Change - when checked it will check if the command type was changed, and if it was will modify the command as such.
- Recognise Layer Type Change - when checked it will check if the layer type was changed, and if it was will modify the command as such.
- Recognise Subcommand Change - when checked it will check if subcommands were added or changed, and if it was will modify the command as such.
- Command Types - lists registered command types (for reference).
- Edit Box - each element in the command is listed on a per-line basis and it should be edited further this way. Remember that rules of stringing up commands are the same here, that the first element must be the command type, the second element is the layer type, and the last element must be the target group.
- DUPLICATE Render Pass - duplicates a render pass.
- SORT Render Passes - sorts render passes based on ascending or descending order.
- REPLACE ASSOCIATION with selected Group(s) - replaces the associated groups of the selected render pass with the ones currently selected.
- ADD ASSOCIATION as ACTIVE GROUP - associates the selected groups with the render pass as an active group.
- ADD ASSOCIATION as OTHER GROUP - associates the selected groups with the render pass as an other group.
- REMOVE ASSOCIATION with selected Group(s) - removes the currently selected groups from the list of associated groups of the selected render pass.
- AUTO TARGET GROUP ASSOCIATION - if for some reason the render pass has been disassociated with its target group, using this convenience command will automatically re-associate the render pass with its target group (if it still exists).
- NAVIGATE to IMAGE OUTPUT folder of selected passes - opens up Windows Explorer and navigates to the image output folder (final breakout images folder - not test render images).
- NAVIGATE to BREAKOUT SCENE folder of selected passes - opens up Windows Explorer and navigates to the breakout scene output folder.
- Run PRE-BREAKOUT LScript for selected passes - runs the pre-breakout of the selected passes LScript manually.
- Run POST-BREAKOUT LScript for selected passes - runs the post-breakout LScript of the selected passes manually.
- OPEN breakout scene - opens the breakout scene of the selected passes in another instance of Layout. This instance can be defined in the Layout Command Line field in the Preferences.
- IMPORT Render Pass - imports a render pass from a definition file.
- UPDATE RENDER PASS STATUS - checks if the image sequence for this render pass has been completed. If it has, the magnifying-glass icon will change colour based on its status:
- red means there is no breakout scene
- orange means there is a breakout scene but no rendered images
- blue means there is a breakout scene but rendered images are not complete
- green means there is a breakout scene and all images have been rendered.
Test Render Menu
The Test Render menu is divided into three sections: test render presets, buffer preview, and Photoshop export functions.
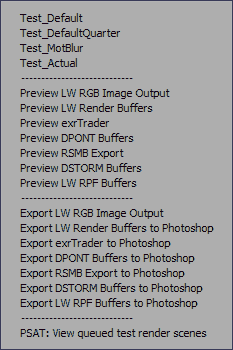
Test Render Presets
Test render presets is the first section. Selecting any of these will execute a test render on the selected passes.
Preview Buffers
The preview buffers functionality opens up the referred buffer images in your external viewer. LW RGB Image Output refers to the main RGB saver (typically the final beauty buffer). Note that in order for these options to work you must have already test rendered your current pass/layer.
Export to Photoshop
In the same way you can preview the buffers, you can also send those buffer images into Photoshop directly. See the section on Exporting to Photoshop for more details on how it works. Note that this is a 'legacy' feature, superseded by the new Janus_SendTo_Photoshop script.
PSAT: View queued test render scenes
In pseudo-sattelite rendering (PSAT), test render files are queued as they await a node being assigned to them. If for some reason you wish to remove scenes from the queue, select this option.
Global Settings
The Global Settings area a dual-purpose panel. By default, it is the location where default values are inputted for the project. When you check a certain parameter and set its respective value field, you are telling Janus that this value is the default value for your current project. Say you are working on a TV episodic show; you set your resolution to NTSC or PAL, and your frame rate 29.97 or 25, respectively. This makes sure that every pass you do adheres to these settings. Note, however, that these are the default settings. Parameters may be further changed based on the command, or the groups that are being processed.
Render Pass Subcommand Category Mode
This panel also has another mode called Render Pass Subcommands, which, when activated, displays the the current pass's settings in a list format, similar to how you would view Global Settings. This allows you to modify subcommands in a more user-friendly way.
Literal Subcommand Display
There is also a 'sub-mode' to Render Pass Subcommands called Literal Subcommand Display which is activated through the Preferences. When activated, the subcommands of the selected passes are displayed as their usual strings, but in a list view. This is an alternate display of how the Multi-line Editor presents render pass editing.
Preferences
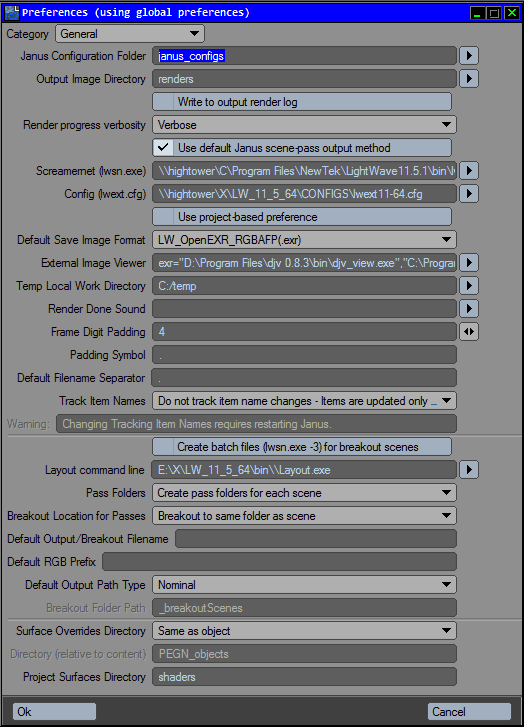
This button opens up the dialog box, which shows the all-important Preferences. There are two
General
- Janus Configuration Folder - specify the name of the relative folder that will be created on a per-project basis. This is where the location where Janus will drop its per-project configuration files
- Output Image Directory - specify here the project's final renders directory. You can input a relative or absolute path. Also, you can use Constant Variables, like %JN_CONTENTABS% to dynamically change this.
- Write to output render log - when activated the shell window's output will be piped to a render log located in the Janus configuration folder with a filename identical to the scene file being rendered (with a .log extension)
- Render progress verbosity - this sets the verbosity of the LWSN output to the shell (or the render log, depending on what you have chosen)
- Use default Janus scene-pass output method - if unchecked, you can bypass the default Janus method of using the scene name and pass as output image subfolders. In the default way (eg checked), an additional scene folder and pass folder are created under the image output directory. If this behaviour is deactivated, then the user must use some combination of constant variables or user functions to ensure that their output image paths remain unique since Janus will not be managing the paths.
- Screamernet (lwsn.exe) - specify the absolute location of the lwsn.exe (Screamernet module) file.
- Config (lwext.cfg) - specify the absolute location of the configuration file to be used.
- Use project-based preference when possible - this enables the use of a project-based Janus_GlobalPreferences.txt file. If the option is checked, and if a file called Janus_GlobalPreferences.txt is located in the root of the content directory - or alternately, in the Janus configuration folder - Janus will use these preferences instead of the one in the support folder.
- Default Save Image Format - this is default save image format that will be used unless overridden by the OUTFORMAT subcommand. This setting does not include Buffer Savers' file formats.
- Ext Image Viewer - specify an external viewer. Multiple image viewers for different file types are possible. You can do this by specifying an extension, followed by an equals sign, and then the path to image viewer. When specifying multiple viewers, you must separate them out between commas (,). Note that because commas are used to delimit the paths, make sure that the path to the image viewers do not have commas in them as this will confuse the field's parser:
- Ex: "C:/Program Files/XnView/XnView.exe",psd="C:/Program Files/Adobe/Adobe Photoshop/Photoshop.exe"
- Temp Local Work Directory - specify a local directory which Janus may use to process render passes. When working in a network it is possible that Janus's processing will be slow. Specifying a temporary working directory will ease this problem.
- Render Done Sound - you can choose an sound file that will play every time a test render completes itself.
- Frame Digit Padding - this value can be from 3 to 6 (LightWave 9.x). For LightWave 8.x users it is valid from 3 to 4. Frame padding is the number of digits for each frame.
- Pad Symbol - this is the string that will be appended after the base image file name; this character separates the base file name from the frame numbers.
- Track Item Names - changes the behavior of the Items in Group list, whether or not you will allow Janus to dynamically update stored item names for you.
- Do not track item name changes - this is the original and default behavior of Janus. When you rename, clone, or delete an item in Layout the reference to the object will be maintained in the Items in Group list. This is advantageous when you have different versions of scenes that share some item similarities, so that you do not keep on re-assigning items that exist only on some scenes. Also advantageous in cases where you accidently delete, clone, or rename an item in Layout; Janus will keep the original name intact in its list.
- Track item names automatically - this option will use an item's internal ID to track changes to the item. Thus, when you rename or clone an item, the Items in Group list will update it to match Layout. If you delete an item, the slot that originally carried the item will be marked '(none)'; you though the item does not exist, you still must manually delete this slot for it to go away. This option is advantageous if the scene you are working on does not share any item names of related scenes; if you are using Janus while you are still organising your scene, this option will save you time from having to remove and reassign item names that are being modified.
- Create batch files (lwsen.exe -3) for breakout scenes - if checked every breakout scene will be accompanied by a batch file that can be run to render the scene. It will spawn an instance of lwsn.exe using mode 3.
- Layout Command Line - this field specifies the executable (lightwav.exe or Layout.exe) and any user flags you use to run LightWave that Janus will call when you open the breakout scene from within Janus using the Render Pass menu > Open breakout scene function.
- Pass Folders - specifies how to output scenes that were processed as passes. See the Pass Folders section
for practical usage examples of this feature.
- Do not create pass folder for scene - when a pass is created it is put into a folder as specified by Breakout Location for Passes without creating any further folder for it.
- Create pass folders for each scene - a folder is created whose name is the scene's filename. All passes processed for that scene will be put into that folder. Furthermore, this folder is placed / created into a folder as specified by Breakout Location for Passes.
- Breakout Location for Passes - specifies the location for render passes that have been broken out (e.g. outputted)
- Breakout to same folder as scene - regardless of whether a pass folder is to be created, all breakouts will be placed into the same place where the scene being processed resides.
- Breakout to user-defined folder - all breakouts will be placed in a folder that can be relative or absolute paths. An absolute path is defined by specifying a drive letter. If you only specify folders then it is considered a relative path, in which case it will be relative to the scene's original path. This folder is specified in Breakout Folder Path.
- Default Output/Breakout Filename - specifies the filename of the final breakout. If this is left blank Janus will revert to its default convention. Specifying a string here will only modify the breakout filename, not the file location. Because this value is applied to all breakout scenes, it is sensible to use constant variables or user variables for this field.
- Default Output Path Type - this is a global setting that sets whether or not the RGB Output paths will be written as relative paths, or absolute paths (e.g. default LightWave behaviour). If 'nominal' was chosen, then this global parameter is disregarded.
- Breakout Folder Path - specifies the folder in which to put render passes in. This can be both absolute or relative paths. You may also use constant variables or user variables in this field.
- Surface Overrides Object Directory - specifies where to put objects that have been saved out due to having been surface-overridden.
All objects
follow a specific directory structure and naming format.
- Same as object - places the surface-overridden objects in the same directory as the original object.
- User-specified under project root - places the surface-overridden objects in a folder specified in User Directory. This User Directory is still assumed to be relative to the current content directory (e.g. project root)
- User Directory (relative to project root) - specifies the name of the folder, relative to the current content directory, that surface-overridden objects will be placed.
- Project Surfaces Directory - specify the directory, relative to the current content directory, that your project-centric surfaces / shaders are located. This directory will be also be used to locate surfaces that you will use to override surfaces of your objects.
- Pre-Breakout LScript - specify an LScript that you want to execute at the very start of a breakout pass process (per-pass).
- Post-Breakout LScript - specify an LScript that you want to execute at the after a breakout pass process has completed successfully.
Test Rendering
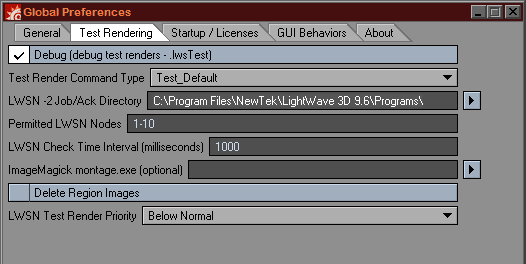
- Debug - when debug is checked, test render files (.lwsTest), and the batch (.bat) files used to render them will not be deleted. Useful if you're troubleshooting a render pass, or sending in a bug report. However, your project directory may become cluttered when you have a lot of these test files, so unchecking debug will delete those files for you after they have been test-rendered.
- Test Render Command Type - test renders have a special command type; it tells Janus to change particular settings when you ask Janus to test render. By default, there are three (3) test render command types: Test_Default, which turns off motion blur, and turns the resolution to 50%; Test_DefaultQuarter, similar to Test_Default, but makes the resolution 25%; there is Test_MotionBlur, which keeps motion blur turned on. If you wish to modify these parameters or make new test render command types, read Creating Command Types for an overview on how to create command types in general, and/or read about the Test Directive for more specific information about test render command types.
- LWSN -2 Job / Ack Directory - specifically for the PSAT feature, this field points to the job / ack directory required by your LWSN farm, if you are currently running one.
- Permitted LWSN nodes - this specifies which nodes Janus is permitted to use in your farm for use with PSAT.
- LWSN Check Time Interval (milliseconds) - this is the time interval Janus uses to check the status of nodes before, during, and after PSAT rendering.
- ImageMagick montage.exe (optional) - ImageMagick.exe is used to stitch tiled images if region rendering was enabled. Specify the location of montage.exe if you are using region rendering.
- Delete Region Image - checking this will delete the separately rendered images from region rendering.
- LWSN Test Render Priority - you may change the LWSN priority during test rendering.
Startup / Licenses
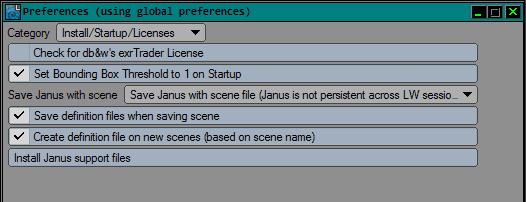
- Check for db&w exrTrader License - Janus will check for your exrTrader license whenever you open Janus. If you do not have an exrTrader license, you can turn off this check by unchecking this option.
- Set Bounding Box Threshold to 1 on Startup - Janus GUI performance is affected when Layout is updating its own viewports. By turning down the bounding box threshold in Layout, this lag is reduced when Janus is opened. You may choose to automatically lower this parameter when Janus opens (Janus reverts to your original setting when you close Janus).
- Save Janus with Scene - if you wish Janus to be persistent across separate scene (e.g. not associated with any particular scene), then uncheck this option.
- Save definition files when saving scene - this option will automatically save your Janus definition file when you save your scene. It is a convenience feature; however if you wish to control the saving of your settings separately, then uncheck this option.
- Create definition file on new scenes (based on scene name) - if Janus is run on a new scene and has no associated definition file, Janus may create a new definition file based on the new scene's name (by checking this option), or it may go the last-used (or the default) definition file (uncheck this option).
- Install Janus support files - this button installs the LScript portion of Janus support files.
GUI
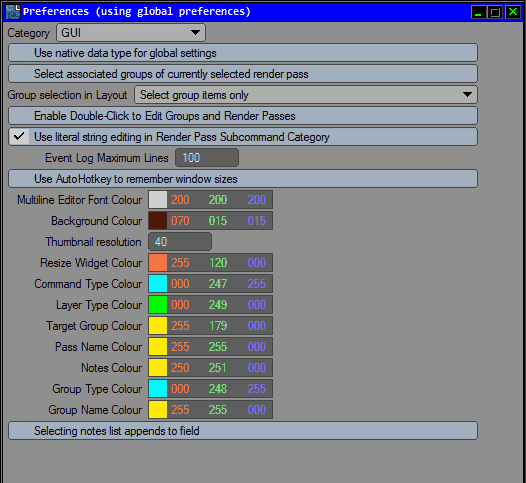
- Use native data type for global settings - Some parameters, such as Start Frame, is an integer value in LW, but in Janus it is treated as a string for the purposes of flexible use within Janus. If you want to manipulate values in the same way LW does (ie using math operators in number fields), turn 'on' Use Native Data Types; it is turned 'off' by default. You must restart Janus after changing this setting.
with this option check, Janus will highlight (e.g. select) the groups that are associated with this render pass.
- Select associated groups of currently selected render pass - with this option check, Janus will highlight (e.g. select) the groups that are associated with this render pass.
- Group selection in Layout - you can tell Janus to select items in LightWave Layout based on the group selections you have on the Janus GUI.
- Enable Double-Click to edit Groups and Render Passes - double-clicking on a group or render pass will bring up the Group Overrides dialog (for groups), or the Multi-line Editor (for render passes).
- Use literal string editing in Render Pass Subcommand Category - when checked, this activates the literal string display when using the Render Pass Subcommand Category to display subcommands in the Global Settings panel.
- Use AutoHotkey to remember window sizes - AutoHotkey is an OS-level scripting language that employed by Janus to remember window sizes. If you have AutoHotkey installed, and wish to employ this feature, check this option.
- Multi-line Editor Colors - Multi-line Editor colors can be changed with these parameters.
- Thumbnail Resolution - When using the Thumbnail List mode, you can specify the size of your thumbnail in pixels.
- Command Type Colour, etc- the render pass and group list can be color-coded so that the various elements of the subcommand or group can easily be recognised.

- Selecting notes list appends to field - if checked, selecting from the notes field popdown will append the selected entry instead of replacing it.
Subcommand Options

- Use regular expressions - uses regular expressions in strings where supported (currently only subcommands are supported).
Offline
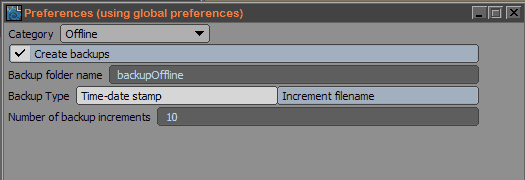
- Create backups - check to create backups when using Janus in offline mode.
- Backup folder name - use this folder name to store backups to; this is relative to the location of the file being backed-up
- Backup type - the naming format to use: time-date stamp uses the current time and date as filenames; the increment filename simply appends a versioning number to the original scene file.
- Number of backup increments - the limit of the number of backups before it starts overwriting the oldest one.
Hotkeys
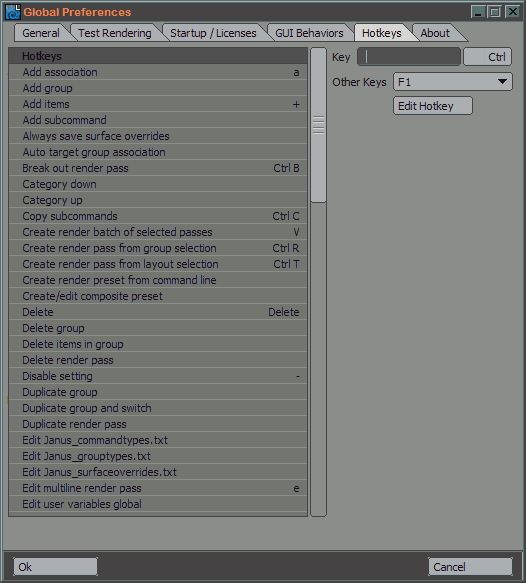
- Hotkeys list - the hotkey list contains all the available commands within Janus that can be mapped to keys. Most of the entries here are menu and button functions found throughout the Janus interface. Of note, there are two commands, Next Setting and Previous Setting, which cycle through the selected parameter's setting list entries, are the only commands that do not have a GUI control representation.
- Key - type in any hotkey you want to appear here.
- Ctrl - this checkbox denotes if you want to include the control modifier with your hotkey entry.
- Other Keys - this popup contains a list of other keys (such as function keys) that Janus can detect and use. If you select an entry here, the Key field is automatically filled with the selected value.
- Edit Hotkey - pressing this button will add or change the selected function with a specified hotkey/hotkey combination.
Note: Janus only supports the Control modifier; you cannot mix Shift or Alt with each other, or with Control. The resulting hotkeys are stored in Janus_GlobalPreferences.txt under the [HOTKEYS] section.
External Applications
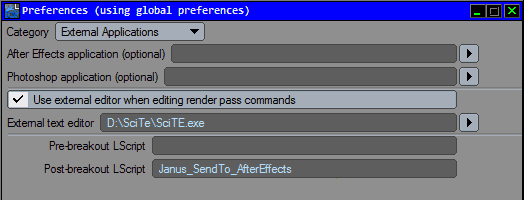
- Path to external applications - supply the location of external applications.
- Use external editor when editing render pass commands - when checked an external editor can be specified. If no editor is specified, then the OS's default text editor will be used. Note there is a behavioural limitation: if the editor being specified is a singleton programme (ie a tabbed text editor) then Janus will not be able to detect the change in the file until that programme quits, which may be an issue if you use the editor for other purposes. Janus depends on the exiting of the text editor's process before it can be safe to signal Janus to update the render pass data with the updated contents of the edited text.
Configure Menu
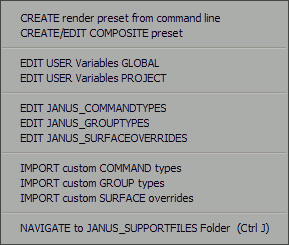
The Configure Menu enables access to Janus configuration files, such as the Command Type files.
Configure Menu on the PC
Configure Menu on the Mac
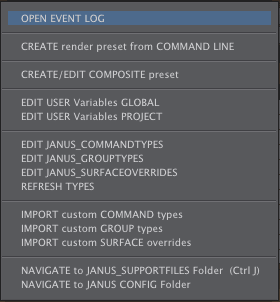
- OPEN EVENT LOG - (Mac only) This open up the event log via TextEdit (or the default text editor).
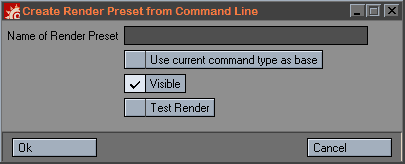
- CREATE Render Preset from Command Line - this is a convenience feature that take the current command line parameters and generates a test render preset from it.
- Type in the new preset in the Name of Render Preset field.
- Use current command type as base: this will inherit the current command type of whichever is in the command line when you run this function.
- CREATE / EDIT Runtime (Composite) Preset - creates or edits a composite command type from the command line. This will prompt you the Create Runtime / Composite Preset dialog:
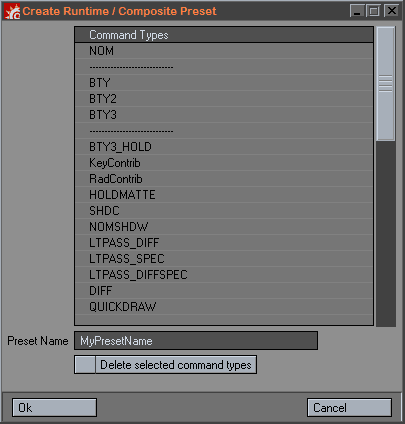
- The Command Types list shows all the available command types.
- To add a composite preset, select the command types that make up the composite command type, then input the preset's name in the Preset Name field, then hit OK.
- To delete a command type, select them in the list, then click on Delete selected command types, then hit OK.
- EDIT User Variables - opens up the Global Preferences file so that you can edit user variables.
- EDIT Janus_CommandTypes.txt, JANUS_GroupTypes.txt, JANUS_SurfaceOverrides.txt - these commands open up their respective configuration file. See Creating Group Types on how to create custom group types, Creating Command Types on how to create custom command types, and Partial Overrides for more information on how to create Partial Surface Overrides. this is a convenience feature that take the current command line parameters and generates a test render preset from it.
- IMPORT custom ... - these functions enable you to choose a text file to import to the corresponding configuration file. This feature is useful when you want to share command types, group types, or surface overrides settings between users, or between the developer.
- NAVIGATE to Janus_SupportFiles Folder - opens up the support files folder.
"Quick Change" Command Type, Layer Type, Target Group
"Quick Change" popup controls allow you to change the command type, layer type, and/or target group of the selected commands.
- C - Command Type (changes selected commands to this type)
- L - Layer Type (changes layer type to FG or BG)
- T - Target Group (the list of currently listed groups are displayed here.

Other Functions
Save Changes
Clicking this button will save changes in the Group List, Items in Group List, Global Settings, and Command List. Changes will be written to the currently set definition file.
Resize Widget
The orange line between the Global Settings area and the Command List is a resizing widget that allows you to increase or decrease the size of the Global Settings area and the Command List. When you click on the widget it will turn red, signalling that you should drag left or right. However, you will not see any resizing done until you release the mouse button. Janus will close the and then reopen the interface with the new sizes. Take care not to resize too often since this opens and closes the interface, which is often associated with LScript crashes.


![]()







![]()