INSTALLING AND CONFIGURING JANUS

Janus Files

This the list of Janus files that should come with your copy.

Installing Janus

  1. Copy Janus.lsc to your desired plugin directory. Then copy the Janus_SupportFiles folder into the same directory as Janus.lsc. Both must reside in the same directory (see image below).
  2. JanusOpenGN.ls and JanusCloseGN.ls are Generic LScripts that are, likewise, added as plugins, and meant to be assigned a hotkey. Note, however, that JanusOpenGN.ls is to be assigned the hotkey, not JanusCloseGN.ls. JanusCloseGN.ls is needed only as an accessory, but is not meant to be run directly by the user.
  3. If you are trial user, use JanusTrialOpenGN.ls instead.
  4. Janus is installed in LightWave like any other plugin. Use the Add Plugins command in Layout and add Janus.lsc. You will then find the script listed in the Master Plugins menu (default hotkey CTRL + Q). Select Janus to run the script.


    Important note on permissions:

    Janus requires that the current user must have file permissions to write at the location where Janus is residing, as well as the content directory. Turning UAC (for Windows 7) usually solves write-permission problems.
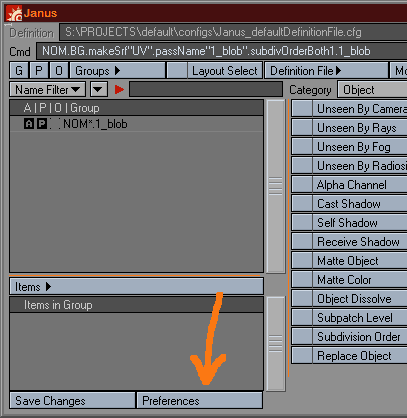
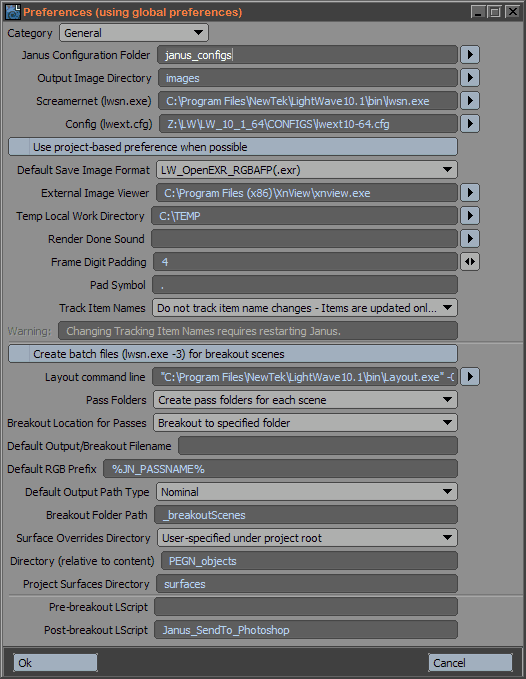
 

Configuring Janus

    A note on UNC paths:

    Prior to LightWave 11.6, UNC paths in LScript have not been broken where the last character of the path is stripped. This affects Janus's operation. The only workaround to this is to add an extra backslash on any UNC path that's being used. Typically, this means the content directory and the configuration directory.

    If, for example, your content directory was \\LWserver\D\Projects\NewProject, it should now read \\LWserver\D\Projects\NewProject\.

    If you use the -c switch when running LW, and you use a UNC path there, add an extra backslash at the end. Example: -c"\\LWsever\C\LW\config", should now read -c"\\LWsever\C\LW

  1. Janus tries to self-configure when you start it up. But if it fails to configure for some reason, you need to do it yourself. If Janus gives you an error message saying "Unable to locate config file" it means the LWEXT extensions file (lwext#.cfg/Extensions) can't be found. This, along with the location of LWSN.exe/LWSN must be specified.
  2. Double-clicking on the Janus entry in the Master Plugins list will bring up the GUI.
  3. Click on Preferences.
  4. Go to the Install/Startup/Licenses category.
  5. Click Install Janus support files. This installs Janus support LScripts.
  6. Go back to the General category and input the appropriate data into the fields. The ones that are most important to fill are:
    1. Janus Configuration folder (by default, this is a relative path; absolute paths are ok)
    2. Output Image Directory (by default, this is a relative path; absolute paths are ok)
    3. Screamernet (lwsn.exe)
    4. Config (lwext.cfg) - point this to the actual .cfg file
    5. Default Save Image Format - though this is can be changed on a per-project, or even per-pass level, this image format will be used when the format cannot be otherwise resolved.
    6. Temp Local Work Directory - this is very important, and you should specify a local drive that you have read/write permissions.
    7. Frame Digit Padding/Padding Symbol/Default Filename Separator - though this usually populated, make sure it is your desired value.
  7. If you have an external image viewer, specify the .exe file. If the image viewer does not seem to work well with Janus, leave this field blank. And then make sure that default image viewer used for your image format is set in the operating system. Janus will simply call on the image and let the OS pick the appropriate image viewer. If you wish to specify multiple image viewers for different formats, see this section.
  8. The next step is very important: remove Janus from the Master Plugin list and then reload it again. Then proceed once more to the preferences and select a Default Save Image Format. Once you have done so, click OK.
  9. Last step is to finally restart LightWave (to make sure that all plugins additions have been written to the extensions file). And then you may start using Janus.

Content Directory

Janus relies on the user setting the proper Content Directory, since it will further output essential "work files" to the root directory of your project. Make sure you have set your content directory correctly prior to using Janus.

Configuring Photoshop

Janus can work with Photoshop by sending completed test render images (and buffer images) for immediate preview compositing. Currently, only Photoshop CS3 thru CS5 have been tested to work (but previous versions may still work).

  1. Copy Janus_ReceiveImages.jsxbin to any fixed location. You can keep this file in the SupportFiles folder, or you can copy it into the Presets/Scripts folder of your Photoshop installation.
  2. Run Photoshop. Make sure that there are no documents open.
  3. Create a new Action, and start recording the following steps:
    1. Go to File > Scripts > Browse...
    2. Select Janus_ReceiveImages.jsxbin in the location you've placed it in.
  4. Stop recording.
  5. Create a droplet from this new Action:
    1. Go to File > Automate > Create Droplet...
    2. Select the appropriate Set and Action from the dropdown lists, and choose a location for the droplet; this droplet should be placed in the SupportFiles folder and should be named JN_DROPLET.exe. Follow the options set down in Play section below. Leave the Destination popdown set to "None".
    3. Hit OK to create the droplet.

This completes the configuration for Photoshop. Once you've rendered test images from your passes, you can start sending test render images to Photoshop via the Test Render menu.